Trendy Broccoli Teenage Haircut Tutorial
by JATAI Academy,
20 May 2026
The broccoli teenage haircut is a popular textured crop style that consists of a curly textured top and a taper fade in the back. Popularized by teens, specifically boys, it's a natural look that requires just a little styling cream. Disheveled mod teen haircuts usually have natural movement and a low fade.
The hair has a longer top and the texture adds volume. This leaves somewhat of a fringe where the hair can go right to eye level. It works best with normal to thick hair types and curly or wavy hair.
Watch this broccoli teenage haircut tutorial and follow along with the transcript below.
Disheveled Broccoli Teenage Haircut Tutorial:
Welcome back to Jatai Academy. I'm Russell Mayes, Director of Content. Today we're going to be doing the messy curly mod that's got a slight taper to it. Better known as the broccoli or the llama cut. All the kids love this haircut today.
So, we're going to show you how to make sure you taper in the sides just enough to keep it clean without removing all your length.
We're going to show you how to taper in the back real nice, but also more importantly, how to blend the bottom to the top where it transitions from straight hair to curly hair without getting a shelf. And we're also going to leave the bangs long enough just to irritate your mom. So, let's get started.
Cutting the Sides

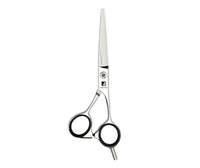
Starting off with my Jatai Tokyo Scissor. It has a long, thin blade, so I can cut a lot of hair at one time because the blade is so long, but also because it has a nice clean point on it that I can do a lot of detailing with it where I need to.
So, I'm going to take my first section at an angle right there at the front of the hairline, and I'm going to pull that slightly forward and angle my fingertips away from the head. So, I'm getting longer at the top of the section and tapering it in shorter at the bottom of the section near the hairline.
So, you'll see my knuckles are planted and my fingertips are actually elevated away from the head as I'm pulling it slightly forward. So, what this does is this not only gives me graduation from the hairline as it gets longer up the section, it also graduates it from the front to back. So, I'm not only introducing graduation from the bottom to the top, it's graduation from the front to the back.
Now, I'll just follow this same hairline, the same sectioning that I started at the front hairline all the way down into the nape into the center of the head.
I'll follow that same section. I'll walk my guide back. I'll pull this slightly forward to the previously cut section. And as I get behind the ear, you'll see that it will continue to taper in tighter and tighter at the nape.
Now, I can only cut it as short as my fingers show. I can't cut it shorter than my fingers holding it in my hand. So, this is just giving me a foundational shape that I will go back and fine-tune with the clippers to taper it in cleaner down at the nape.
Now, I'm walking my guide from the front all the way into the center of the back. And the way you walk your guide is you take your first section, you hold it however you want, you add section number two to the first section, and you cut section number two.
I remove section number one, and then I add section number three. And then so on and so on until I get all the way to the center of the back of the head.
Now, once I finish this section right here, I'm going to check the lengths and make sure everything is exactly like I want it. After I got the lengths on both sides like I want, I'm going to go back and just make it cleaner around the ear.
So, I'm not going to taper the sides really, really tight like I will the back, but this will make the whole shape look super clean just by outlining the ear a little bit.
Now, I'm going to add a little bit of Jatai Blade Glide. This keeps a consistent moisture content throughout the entirety of the haircut and also makes the cuticle compact so it's easier to comb and detangle and gives me a cleaner cut.
Now, we're going to go back and do the same thing on the other side. I've got my first section here. I'm going to try to match sides. Now, easy way for me to match is after I take that first section, I'll check the lengths at the top because I know that length at the bottom is going to be tapered tight. So, I'll just change my angle to make sure I get everything the same on both sides.
Tapering with Clipper Over Comb

Now, I'm going to go through with my clipper and do a little clipper over comb just so that I can make that nape a little bit tighter. I want to make it clean and tight and a little tapered. I'm not going to necessarily go through and fade the whole thing in, though you can if you want to. I just want to taper this in nice and clean.
Now, we're just going to continue our clipper over comb so I can taper that in nice and tight. And I'm working from the center over to the ear. I'm not going to go up past the mastoid, which is that bump right behind the ear. I'm taking everything up to that.
And I will tend to not round this out. The modern barber tapering that they're doing on these longer cuts is kind of a square-ish taper around the back where they're leaving a little bit of length right there behind the ear at the mastoid.
Graduating the Back

So now after we finish tapering in the back like we want, we're going to go through and take a center part on top where the head starts to curve back. That's going to separate the front from the back of the head.
So where the head is curving down, that gives me all the hair that falls behind the back and then all the hair that falls in the front.
So now we're going to take a center section after we've taken our center parting. Now we're going to take a center section. I'm going to hold this out vertically and using the length that I had from underneath where my initial taper was. I'm going to continue that same angle of graduation up and out.
So, I'm just following whatever that angle was and taking everything up and out. Now, as I'm working on this shape, I'm not too concerned with that transition area between where the hair is shorter and straighter and where the hair starts to curl. You can see that kind of corner pop out right there. I'm just going to pivot from the center section.
So, now I have my center initial section. I have pivoted around to the right side. I'll use the center as my guide. Hold that out. Cut whatever hangs off from my previously cut guide and continue that graduation up and out.
Now, as I was saying before, I'm not worried about where it transitions from straight to curly cuz you'll always tend to get a little bit of a ridge and sometimes an indentation there. But I'm not worried about it. We'll go back and clean that up and fine-tune that later.
Right now, I'm just getting my lengths to fit in to make sure everything blends from bottom to the top. I'll remove my center section, which was the first section, and continue to walk my guide over towards the corner of the hairline.
So, whatever hangs out from my previously cut guide, I'll cut that off. And then make sure everything is nice and clean. And that's looking pretty good. Now, my last section here, I'm not continuing to pull this all the way 90° from the head. I'm actually going to take it right to the corner of the hairline right there.
So where that is, that's where I'm pulling that side section to because I want to build up a little bit of a corner right through there so that I can transition into the sides.
It's just a more modern interpretation of this that you see a lot of these barbers doing where they're leaving a little weight behind the ear right there as opposed to tapering everything all the way around.
Give us a follow on your favorite social media at @JataiFeather
Now going back and doing the same thing on the other side. Taking my center section and then pivoting on the other side.
Cutting the Top Sides

After I finish that, I'll come into the side of the head. Take a horizontal section. Hold this straight out. Find my guide from the back, not from underneath. Hold that out at elevation. And then go through and point cut, leaving a little longer length in the front, but using that length from the back of the head as my guide length.
I want this to hit just at the top of the ear. A little over the ear is okay, but I don't want to get it too long over the ear where it starts to look kind of mushroom-y.
I want to make sure that I have enough length to maintain the shape, but not so much that it starts to puff out. And that's why undercutting that side helps keep it from being too puffy.
The next section after I've cut the first. I'll follow that and continue to elevate each section a little bit higher as I work up the head. So, I'm not pulling it down. I'm pulling it perpendicular to the top of the parting. So, wherever the top of the parting is, that's the elevation that I'm holding it up at.
Continuing to follow everything through to make sure nothing hangs over. And following that all the way through, leaving a little bit of length right there at the front. And that's looking pretty good right through there.
My last section and very little to cut. So, no problem there. Very little. Perfect. After we got that cut, we want to check the lengths and make sure everything blends like we want and it's the right length for the shape.
Now, we're going to take a section straight across the front of the head. Because I'm pulling everything to the sides, I want to make sure I don't have too much of a point build up right there at the front. So, that was already cut, so I don't have to worry about that. But, if there was a point, I would cut that off.
Clipper Cutting

Now, we're going to go through and diffuse just to get all the curls kind of dry and exaggerate that shelf in the back so that I can fine-tune and clean that up. Now, after I've got everything dry, cuz clippers cut better on dry hair, I'm going to take the guard. This is about a one and a half.
And I want to just go through and taper that in a little bit tighter right there at the nape. So the last probably 1 in of the hairline right there, one inch of the of the section, I'm just going to taper that up and out.
So I make sure that the clipper is touching the head right at the hairline and then kind of freehand that up and out. This will make it much cleaner and tighter around the nape.
Now I've moved down to a half size blade and I'm just taking that little bit of hair off right at the hairline just to make sure it fits in real nice and clean. The take your time and be patient. Make sure it's clean.
Refining with Thinning Scissors

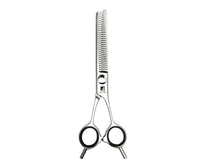
Now I'm going to go through and use my Jatai Tokyo Scissor. This is the perfect thinning scissor, blending scissor to make sure you can get all your shapes blended and have the right amount of texture to it.
Now, where that shelf is, I'm just going to go through and freehand scissor. Just freehand it. Anything that sticks out, I'm going to go through and thin off to make sure I can blend any kind of shelf that happens to stick out where I'm transitioning from short to long.
If it's thicker, I use a little scissor over comb just to make sure everything blends. Be patient and diligent and it will all blend perfectly.
Final Look

Alright, here's our end result. And I think that we're looking pretty good. We've got a nice amount of irritating curl in the front that they can hide behind. They can hide their eyes behind or if you push it to the side, you get a little bit of a K-pop feel for teenage guys.
But, you know, the whole idea of this haircut is to just have this mess of curl and it's not real structured. So, then we taper it in around the edges. We taper it in our nape. But there are no tapered sides, just the back.
And the hardest part is just the transition from the bottom to the top where you go from straighter to curlier hair. And that just all requires fine-tuning on your part. Fine-tuning of free-handing it, thinning it out a little bit, and then free-handing it again to make sure it pops in just right.
And I think we're looking pretty good. I think this is just enough to make your mom angry that she's asking, "Why didn't you cut more of it off?" So, I think it's perfect.
Anyway, check out the Jatai Academy. There's all kinds of fantastic information on there that will make you better hair stylist and barber. Also, let us know what you'd like to see in the future. Thank you so for Thank you so much for watching. We'll see you next time.
SHARE