Rounded Graduated Bob Cut Tutorial with a Razor and Scissors
by JATAI Academy,
02 Jan 2026
This is a cute, fun graduated bob cut that's modern with a lot of movement. It's one of those short bob hairstyles that fit a person who has a similar personality. This short hair look has layers, volume and graduation all in one.
With bangs that frame the face and a style that can be easily maintained, this graduated bob haircut is a good one to learn. Watch this short graduated bob cut tutorial and follow along with the transcript below.
Graduated Bob Cut Tutorial:
Welcome back to Jatai Academy. I'm Russell Mayes, Director of Content. Today we're going to be doing a takeoff on the classic round graduation. But we're going to mix it up a little bit.
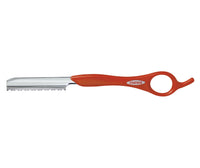
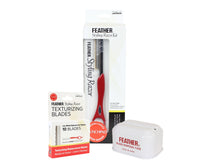
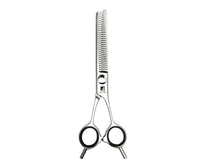
We're going to be using a Feather Styling Razor. We're going to be using some Tokyo Thinning Scissors. We're even going to be doing some scissor over comb. So, I would call this more of a round-ish graduation. So, let's get started.
From the Sides to the Back

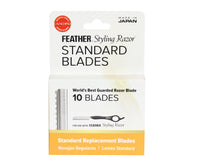
So, we're starting here on the side. We're going to take a horizontal parting right above the ear. And that's going to go across the back. And then we're going to take the parting on both sides. Pin the other hair up and out of the way. I'm going to use my Feather Styling Razor with the Standard Blade.
And this is how I'm going to start the cut. I'm going to start here on the sides so that I can determine the length of my one length over the ears.
I want to match both sides before I start my round graduation in the back. And I'm just taking a horizontal section and just cutting my line blunt. A little longer in the front, a little shorter in the back.
Now, we're going to take a vertical section angled back. And I'm going to use that length that I cut right above the ear as my guide. And I'm going to angle that down, cutting it shorter at the nape.
So, I'm actually graduating the shape, shorter at the nape, longer at the top of the ear. Now, I'm going to angle my parting. I'm going to pivot from where I started my parting and pivot that towards the center of the back.
Following my previously cut guide, I'm going to continue to taper that in closer at the nape, a little longer at the top of the section there. Working everything straight back into the middle at an angle. You can see my angle developing there.
Now, I'm going to pivot again. And with each pivot, that section gets more and more horizontal. So I start out with a very very vertical section and by the time I finish I'm going to go straight horizontal across the back.
And this is going to give me that kind of round beveled graduation where it's shorter at the hairline right behind the ears and at the nape and a little longer in the center back right at the occipital bone.
Now we're just going to pivot again. And each section gets a little bit more horizontal. And as I elevate, it's going to get a little bit higher.
So I'm going with a very, very low elevation right behind the ear. And then as I work towards the back and as my parting pivots, my elevation gets a little bit higher. So, there's a little bit of a feel that goes into this because I have to visualize in my mind what I want my graduation to be and then lay that in.
Now, if I'm using a scissor, it's easier to see the line develop than if I'm using a razor. But the advantage of the razor is it gives me a much softer line and it gives me more movement.
I don't have to be as precise with the length, but I do have to be more precise when I lay that initial cut into it because it's hard for me to go back and fine-tune it and clean it up where the scissor is a lot easier.
Building the Graduated Hair Bob Shape

After I cut it on both sides and I get everything matching, now I'm going to go through and take a horizontal section parallel to the first sections that I took. Now, this is going to help me start building my stronger bob-ish shape
Because I'm using a razor, it's going to bevel it. It's not going to be a real hard edge bob, but I want it a little longer in the front and then just kind of even all the way around. Working from the ear all the way back into the center of the hair. Just using the underneath length as my guide as I'm working from the sides into the back.
Now I'll follow with a parallel section and do the exact same kind of motion and methodology that I was doing before. I have a little bit of elevation here. So I soften up that line.
A little longer in the front, a little shorter right at the ear. And then we're just going to go straight across the back and doing a horizontal cut so that I don't create any kind of pieciness or separation. I'm just creating softness in my cut line.
And I'm just going to follow this right on through and be patient as I work these small sections. If you work with too big of a section with the razor, you're going to end up dulling the blade pretty quick and your line's not going to be nearly as precise as it needs to be for this type of haircut.
Following with another horizontal section and following the previously cut guide. A little longer right at the front, a little shorter at the ear, and then work that all the way around.
Give us a thumbs up and click subscribe and the notification bell to be notified of future Jatai Academy content. You can also leave a comment below, ask a question, and we'll get right back to you and try to answer it.
Now, I'm just going to continue following the same parting that I was doing at the initial section, my very first section. I'm just following that horizontally up until I start to run out of hair.
Anything that hangs over, I'm just going to cut off. Now, since I'm cutting this fairly blunt, I want the elevation to bevel the line, but the razoring is going to give me a nice solid line. You'll see I'll take a nice short kind of stroke right through there. I'm not really filleting this by taking a large stroke and making it softer.
The longer the stroke, the broader the stroke that you take, the softer that the line gets. Checking that out. And I think that that's looking pretty good. Now we got our last section on this side and I'm going to go through and do the exact same thing on the opposite side once I finish this right side.
Fine tuning there. I like that. And that's looking pretty good. Perfect. And I like that little bit longer in the front there as well. Now let's go through and cut a little bit of the bangs.
The Graduated Bob with Bangs

Now, she already had a little bit of bang cut. So, I'm just going to go through and clean that up. Make it a little shorter over the right eye and a little longer towards the left eye.
So, I'm just pulling everything right to that right eye. Taking my angle and then just cutting it short to long. Short at the eyeball, a little longer as it goes to the right. That's going to give me a little bit of movement. And if I need to soften this up later, I can certainly do that.
But this gives me a nice moving shape to where it doesn't hang completely in the eyes without some sort of movement going back and forth. And since I'm cutting it shorter over the right eye of my model, it will actually move to its longest piece. So wherever it's short is where it moves from. Wherever it's long is where it moves to. So shorter over the eye, a little longer towards each side.
Scissor Over Comb

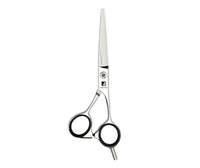
Now I'm going to go through and use my Jatai Tokyo Scissor. This is the 6-inch scissor. And I like to do, I like to use this scissor for scissor over comb because it's a nice long skinny blade and its got a good point. So I'm going to go through right here in the nape right at both tendons and taper that line in a little bit shorter.
I want that to be very very clean right there at the corners and the tendons and a little longer towards the center. So, I'm just going to go through, take my time, scissor over comb, work that in. I'm not going to go through and recut everything underneath. I just want to cut right there at that hairline behind the ear and clean that line up so it's nice and strong and structured.
And it makes that really pop. It makes the shape really pop. When you have a soft shape sitting on top of a harder shape, it really supports it and gives it a little juxtaposition and a contrast in textures. There we go. That's looking pretty good.
Follow us on your favorite social media @jataifeather
I'll just keep working this until I get it in tight like I want. Now, when I'm doing something very, very detailed like this, I want to take my time and be patient and really exert the amount of energy and effort that this little section here really requires because it is almost the main focal point of this entire haircut, is the structured nape that gives me that kind of round graduation. And when I make it really clean right behind the ear, that really makes everything pop. So, I want to take time and make sure everything fits in just properly.
Now, I'm just going to go through and just clean up a little bit right there in the middle. Anything that hangs over that's too long, I'm taking off. I'm not recutting the whole shape. I'm just taking any kind of long pieces that are softening that up and giving it a little bit more structure.
Now, let's go through and blow dry and just get everything dry so I can see how much weight that I have because wet hair hides how dense the hair is and it hides how much texture that I have. You can use your hands or a round brush to shape it with the blow dryer.
Fine-Tuning the Graduated Layered Bob

Now, I'm going to go through and use my Jatai Tokyo Thinning Scissor. This to me is really the perfect thinning scissor. It removes the exact amount of weight that you need. I can go through and hit it several times and remove a lot of weight. I can go through and hit it once and remove a little weight. It's very very seamless. It doesn't give me like big chunky lines left over.
Even though I'm going in straight horizontal and thinning this out from roots to ends, well, from mid-shaft to ends, it doesn't leave me any kind of lines. So, by going through and cutting it horizontal like I am to the head, it doesn't introduce any sort of movement to it. It just evenly thins out the hair.
Now, I've been having some problems here holding the comb, so I like, oh, there we go again. I dropped it twice in the same haircut. There we go. And once I get everything fit in like I want and just pay attention to it and fine-tuning.
Fine-tuning to me is the last 20% that can really make or break a haircut. Getting the basic shape in is easy. It's the fine-tuning that makes it the work of a master.
Final Look of the Graduated Bob Cut with Fringe

Here is our end result. And I really like this shape. I think it is fun. It's cute. It's interesting. And for somebody with the right personality that demands something fun and inspiring and really kind of cute and kawaii ('cute' in Japanese).
I think that this really opens up a whole new world of possibilities by combining the Styling Razor to create texture with a classic type of shape where it's normally very, very solid. This opens up a lot of different variations. So, I really encourage you to incorporate this, not only the shape, but also the technique of applying it and getting that soft texture to it into your repertoire.
Please check out the Jatai Academy. There's all kinds of fantastic information on there that will make you a better hair stylist and barber. Let us know what you'd like to see in the future. Thank you so much for watching and we will see you next time.
A graduated bob can be done on straight, wavy or even curly hair. It can be done on thick hair. It can be made sleek or made voluminous. It can work with various face shapes such as square faces or round faces. Victoria Beckham made popular her bob looking haircut that's similar in style. Thanks for watching this short graduated haircut tutorial.
SHARE