Re-Imagining the Vidal Sassoon 5 Point Haircut using a Razor
by JATAI Academy,
19 Sep 2025
The Vidal Sassoon 5 point haircut is one of the most iconic haircuts of the 60s and 70s. Alongside the Vidal styles he created for Grace Coddington and Nancy Kwan, the 5 point cut is often synonymous with the Mary Quant haircut.
Professional hairdressing at the time was dominated by Sassoon cuts and Vidal made a statement in the fashion industry with his iconic cuts, salons and books. Today we can re-imagine Vidal Sassoon haircuts in a lighter, softer way. With the five point haircut, we can still maintain the geometric haircut shape but give it a modern look.
Watch this Sassoon 5 point haircut tutorial and follow along with the transcript.
Vidal Sassoon 5 Point Haircut:
Welcome back to Jatai Academy. Today we're going to do a challenge. It's a challenge for me to do this iconic Sassoon five-point haircut that was so... it really is what kickstarted Sassoon's career and really created the whole aesthetic of the late 60s and early 70s with this mod look.
It's real solid with a beveled bang, two points on the side, three points in the back, but we're going to modernize it and do it with a razor. It's a challenging haircut, but we're going to show you how to soften it, give it a lot more versatility, and add a lot more texture to it if you want. So, let's get started.
Graduating the Back

I'm going to start here with a horizontal section from the crown to the top of the ears. And then we're going to take a vertical section right down the middle.
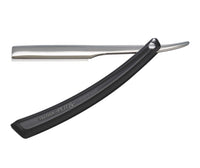
And I'm going to use my Feather Plier Razor. This is a guardless razor, so there is no protection on this. So, you needs to be extra careful. And it is extremely sharp, but it also gives me the most control over cutting a section of hair.
And I'm going to go through and graduate this section in the back. Take a parallel section to that and continue to work all the way over to one side by walking my guide. So, I'm going to pull it out. I'm going to visualize what length of the top of the graduation is going to be, where it hits the ear.
So, I'm kind of visualizing where that top of the parting section is, and I want to kind of see where that's going to hit the ear. And then I'm tapering it down, graduating it down shorter around the nape.
As I cut the center section, that's my guide. And then I start to walk my sections all the way over to the left. So, I'll take the next section, add it to the previously cut section. So, I will remove the previously cut section, and then add to that. So, here I'm taking my next section, and I'm removing all the other hair.
So, I only have the previously cut section and the section that I'm cutting. Holding that straight out in the center of both of those sections and cutting from long to short. Longer at the top, shorter in the nape.
And I'm leaving a little bit of extra length there at the nape so that I can make sure I can get my points very defined. Working all the way over to the side.
Now I'm getting in right behind the ear. And I'm just following the same guide that I started in the center back. Walking that all the way over to the ear.
I can change the angle of graduation that I want. If I want it to stack up a little bit more, if I want it to be a little bit more even like this. It's all dependent upon the angle of graduation that I create. And here's the end result on the left side.
We're going to take our center guide and I'm going to go through and do the exact same thing on the other side. Once I finish that, I'll take my next horizontal section, which is going to be the center of the recession all the way right back to the crown.
Take a vertical section in the center and then follow that same angle of graduation that I was doing underneath up and out. So I'm basically graduating and stacking the whole back so that I get a nice pleasing round head shape in the back.
So by leaving this longer in the crown, it's actually going to bevel the shape and make it look much more pleasing in the crown.
If I tend to change the angle here and go straight up, it tends to make the back of the head look flat. So here I'm doing exactly what I was doing underneath. Taking my previous guide as I'm walking that all the way around to the side and then blending that in with the hair that was cut underneath.
Once I get to the quarter part here, I'll start to pivot my angle and the parting is changing. So no longer is it just straight up and down, but it's actually pivoting and leaving a little bit more length in the front. So each section I take is a diagonal pie section off of that hairline. I'm sorry, off of that parting right at the quarter part using the guide that I had created originally from the back. Working that longer as I get around the front.
So I'm almost getting like a little bob shape around the front. Now, it's not going to be a bob shape in the end because I am going to cut it out over the ears, but this certainly gives me and saves enough length around the front so that I can work everything in nice and smooth. Then from here, after I got that shaped like I want, do the same thing on the other side.
Building Weight on Top

Now, I'll take my next horizontal section and I'll take this all the way around the head. And from here, I'm no longer going to cut vertically. I'm going to hold each section horizontally out.
So, by holding each section horizontally off the peak curvature of the head, I start to build up a little bit more weight on the top of the head. So, a vertical section is going to be less solid than if I take a horizontal section.
So, I want it less solid underneath. So, I take vertical sections. More solid on the top. So, I reserve some length. I take horizontal sections. And then I'll just continue to work that from the center of the back all the way around into the sides and to the front.
Now, this blade is very, very sharp as all the Feather blades are. But since this doesn't have a guard, I have to be a little extra mindful so that I don't end up cutting myself. But the benefit of this is that since it doesn't have a guard, it's very easy to get the exact cut line that I want. And that's the beauty of the Plier Razor is that it gives you the most control and the cleanest cut of any of the razors that I have.
Now, I'm going to continue to work this section all the way up into the center of the head. So, I'm just going to keep following the same type of methodology that I was working before.
That got a little bit long. So, we're going to take a little bit more off. And I'll continue to work this until I end up with all the hair on the top being cut into the side lengths.
Now, detailing this a little bit to make sure I get the line as clean as I want. I can just pinch a little piece of hair off and then lay the razor right on top of it. And that pinching gives me the tension and allows me to get a nice clean cut. So, I'll work this all the way up into the center of the head.
The same thing I was doing before. That curvature of the head shows me where the parietal ridge is. That's the elevation that I'm holding it up at. So, I get a nice stack of graduation and just following the previously cut guide.
Now, this haircut is going to require a tremendous amount of detailing, especially as I'm getting that beveling around the front, but I'll show you how to do that. So, you can see certain stages of this haircut where you think, okay, well, that looks pretty good just like that. So, you can stop there. You don't have to go through and bevel this. There's a lot of options and a lot of versatility with this type of haircut.
Beveling the Front

So, I'll take a section around the front of the head from the first bump of the head to the high point of the ear. I'll hold everything straight down. Start cutting where I want my bevel line to be around the front.
So, the bangs in the center, that's where I'm going to start and then clean that up. Now, you'll see here I'll lay the hair on my finger and then just use the blade to scrape anything off that doesn't quite fit and isn't as clean as I want. There we go.
Just pinching that up and getting that nice and clean. There we go. I like that length there. Now, we're going to continue to work that into the sides into the point right there in front of the ear.
So, I'll pick a guide from the center and then I'll angle my fingers to match the angle of my face framing and that beveling around the front. And then I will cut that line into it. And then I'll start with a nice even cut. Try to get it as clean as I can and then look at it and then fine-tune it as I need to.
Like right here, there's something that doesn't match. So, I'm going to pull that forward. Cut a little bit of that off. Make sure that I take my time and fitting everything in because this haircut is going to show every fault and flaw that you have. And so, you have to take your time to get it to fit just right.
And right there, that was good. That makes everything flow right from the center of the bangs into the corner right there where my point is in front of the ear. Now I'm combing everything forward like a little bowl cut.
Take my section from underneath as my guide and then go through and cut the rest of the hair on top of it directly on top of my guide. I try to keep the razor stroke exactly the same throughout each section so that I can maintain the same amount of weight and the same amount of texture.
I don't want to start with a real loose razor stroke underneath and then go with a real tight one on top. I want to keep everything even. And then if I need to go back in and take some weight out, then I can go through and purposely take weight out. I want to be very, very methodical.
Even though I'm using a razor, which is a softer, more free type of cut, I still want to respect the methodology that I'm going through and cutting. And here I'll keep combing. Comb and comb and look and see where it doesn't fit. See where I need to clean it up. It needs to be cleaned up right there. So the same thing. Pull forward. See where it's not blending. And then fine-tune.
Fine-Tuning

Now right here, I'm going to take my quarter part and right on top of the ear, I'm going to pull out a piece of hair, pinch that, and cut that real short. Right there. Not on top of the ear, shorter than the ear, but laying right on the top of it. Then I'll take a section at a diagonal going from the ear down into the nape. And here I'm going to switch it up.
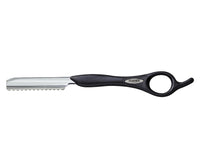
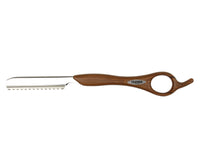
And since I was using my Feather Plier Razor, now I'm going to switch it up and use my Feather Styling Razor in the limited edition wood grain. So this way I can really get in there and fine-tune more without fear of having to cut myself because sometimes I need to fine-tune more than I need the cleanliness and the control of what the Plier provides me.
So this way I can go through and get a really nice clean shape and I can continue to fine-tune without fear of cutting myself. And now I'll just start pinching over the ear and making sure everything blends like I want. And then pinching around the front, making sure that all blends. And I just keep fine-tuning it as I need to.
This is a shape that just requires a lot of refinement to make sure it really falls in like you want it to. Now here I'm going to exaggerate my points in the back. These are the three major points in the back.
So, I'm going to make sure that we can really arc that hairline out to get my kind of Batman kind of tail and then the wings on the side. I felt like the front was probably a little too thick and a little too solid.
And since I wanted a modern version of this, I'm going to go through and razor a little bit, flat razor it to take some of that weight out. This is going to give me a nice lightness and softness and airiness to it so that when I blow it dry, I'll have a lot more versatility to it.
And here there's something right there, right there at the corner of the eye that I just don't like. And I'm going to keep cleaning it up until I get it perfect.
Follow us on your favorite social media, @jataifeather
Blowdrying, Styling and the End Result

Once I get all my detailing finished like I want, I'm going to go through and start blowing dry. And then I'm going to use my Du-Boa styling brush to dry everything very, very neutral back and forth and back and forth until I can get everything nice and smooth and neutral and as much fullness as I want to so where I can whip the hair back and forth.
After that, I'm going to put a little bit of texture paste on it just to enable me to get a little bit of separation and to make the shape really, really pop. Now, I think this looks pretty good.
All right, here is our end result of our modern day five point. We got the key points here. We got three in the back. We got one on one side, a nice little bevel to point on the other side.


And I think that the razor really adds a nice texture to this and makes it look really modern and fresh. You know, this is a very challenging haircut for a lot of people to do, especially me.
But even to take it a step further and do it with a razor, I really think modernizes this really hardcore 70's Sassoon, 60's Sassoon kind of look. So something to add to your repertoire, something to practice.
Please check out the Jatai Academy. There's all kinds of fantastic information on there that will make you a better hair stylist and barber. And also let us know what you'd like to see in the future. We'll see you next time. Thanks for watching.
SHARE