Linda Evangelista Short Haircut Pixie Tutorial
by JATAI,
04 Jun 2025
Learn how to create a Linda Evangelista short haircut that she made famous in the 1990's. One of the most well-known models at the time among Naomi Campbell and Cindy Crawford, she had a vibrant career and earned celebrity status for her modeling. One of the most important contributions she made in the fashion world is her iconic short haircut.
Photographer Peter Lindbergh suggested she get a short haircut and in 1988 she chopped it off in a bold move that shocked the industry. Hairstylist Julien d'Ys created the iconic pixie that soon gained popularity shortly after. Her style was broadcasted all over the news and media outlets, including popular print magazines such as Vogue.
Linda Evangelista has sported many long and short hairstyles over the years, but the short crop pixie made the biggest impact in the hair world in the late 80s and early 90s. Today short haircuts are popular among women, but Linda's has maintained a timeless essence which exudes beauty in any era. Watch this tutorial and follow along with the transcript.
Linda Evangelista Short Haircut Tutorial:
Welcome back to the Jatai Academy. I'm Russell Mayes Director of Content and today we're going to be doing a study of the Linda Evangelista pixie cut, one of the most iconic haircuts of any fashion era.
And we're going to study what makes it great, what makes it work, how to remove enough weight to where it fits in nice and tight but still have some length and that was really her signature.
It was short but she still had length. She's had thickness and it was solid, but it wasn't too bulky. It still had softness and movement. So let's see how we can do that. Let's get started.
Sectioning

I want to take my first section which is going to separate the top of the hair from the bottom. The bottom we're going to fit in real nice and tight. The top we're going to leave a little longer.
We're going to take the center of the recession to the quarter part, quarter part down and then we're going to bevel that out as opposed to just going to a point. I want to bevel this out just to make it flow a little bit better in the back of the head.
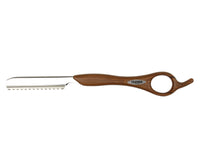
I'll take an angled section right here at the front. I'm going to go through and use my Feather Styling Razor. This is the wood-look option which is my favorite right now. It's a limited edition so get it while you can.
I'm going to take this first section. I'm going to pull perpendicular to my parting. So T to the parting. Now most of Linda Evangelista's pixies were longer in the front about the center of her nose that she would kind of texturize and swift one way or the other.
Cutting the Sides

So I'm going to pull this forward. I'm going to plant my knuckles and then angle my fingers to get that length right at about the center of her nose and then we're going to go through and cut that back towards the ear.
I'll take my next section. This is going to be a parallel section to my first that I just cut. We're going to comb this out of the way. I'm going to take this section. I'm going to pull it forward the same but where this is going to differ is that I'm not pulling it straight forward flat to the head. I'm going to slightly elevate it.
So I'm going off the curvature of the head as I work this back. An easy way to determine that is I just lay the comb right at the parting and it will show me what elevation I take as I go towards the back. That's going to give me a curved line going from the front to the back.
Again pull this out, find my line. There's my guide. Try to take the same broad razor stroke that I was taking before. Cut that down and through. The next section parallel all the way down into the nape.
Now the number of sections that you're going to take is going to be determined by how big the person's head is. The bigger the head, the more sections you're going to take. The smaller the head, the fewer sections you'll take.
Pick up my previously cut guide. Pull out the first. Find the right elevation. Find the right angle. Cut that back towards the ear. Once I get to the ear I'm no longer going to work that all the way in. I'm going to start taking this section parallel to the head, parallel to my parting.

So the parting up here was at an angle. Once it hits the ear, now it becomes parallel to the section. Continue my next section. Pull this forward. There's my angle. I got the right elevation. Lift that up and through once I come into the nape parallel to my parting.
So I start to build up weight here on top of the ear and then it starts to become much more even in its weight distribution as I get down to the nape. And I will continue this until I get all the way just past center.
Next section, since I don't have any hair above where the ear is this is all going to be parallel, parallel to the parting and also following my previously cut guide. There's my length.
Nice. Very nice. It's taking me back. I've got George Michael playing in my head. Now we're going to go through and do the same thing to the other side.
To make sure that I keep my moisture content the same on both sides. I'm going to be using Jatai Blade Glide. This is going to give me the ability to keep my moisture consistent on both sides. It compacts the cuticle and makes it a lot easier to cut with the razor.
I'm just going to go through and take a parallel section to my previous guide which is going to be like that. So now from here I know that I'm going about to the bridge of the nose so I'll pull this out. I'll rock it to where I have about that elevation into it. There's my guide from underneath. Go through. Take that length off.
Same thing as I work from the front to the back. Get my elevation right, a nice broad razor stroke following my guide from underneath as I work all the way into the back of the head. Now I'm going to take a parallel section about the same thickness from front all the way to the back. If I need to add a little moisture I'll hit it with a little Blade Glide. Perfect.
Follow us on your favorite social media @jataifeather

There's my guide. Nice broad razor stroke so I don't build up weight but I do build up length. There's the next nice broad stroke. If I need to have them tilt their head down there's my guide from underneath. Cut that down and through.
Next section and I'm going to continue with this method until I get slightly over the center top of the head. Find the right elevation. There's my guide from underneath until I work all the way into the nape. That looks pretty good.
Now I'm going to go through and do the same thing to the other side. Uh I think we've got a little too much length in the front so I'm going to take a little bit off right in the middle so that'll be easy. Just take a parallel section there.
Yeah we got the sides fine. It's just right in the middle I'm not a fan of so we're going to go through, take that and bevel that shape from the sides into and around the front. There we go.
Cutting the Top

Now to control this kind of point on top it's very easy. It's going to be very simple. I'm going to take a center mohawk section. So I've got my center section here on top.
What I want to do is go through and remove this corner that I have on top by pulling it left and right, front and back. The way I'm going to do that is I'm going to hold this and cut just like this.
I'm going to flick some of this length off by using my thumb against the back of the spine of the razor. I'm not laying it on the actual blade. I'm laying it on the back of the razor putting the hair and then pulling the blade out that will take any kind of length that hangs off over where I push that end of the blade off.
Very little, if anything, right through here. Yeah, very little. If I feel like the hair is too thick, then the way I'm going to remove some weight is not by channel cutting because I don't want to introduce any separation and any sort of movement. I want to keep this a very neutral shape.
So what I'm going to do is I'm going to pull out a section very easy and then just lay the blade directly flat across the entire section and fillet some of that weight out of it just like I'm filleting a fish, filleting some sushi. Take a little bit of that weight out and that will remove the weight without changing the shape or putting channel separation into it.
We're going to continue this on the top all over and just take a little bit of that weight out just gently lay the blade against the hair and then start to rock the blade until it starts to cut. Once it starts cutting, I'll leave it at that angle. Boom very quick, very easy, very very light.
I don't want to get heavy with this razor especially on blonde hair because it will flat cut it off quick because blonde hair tends to be a little delicate, so I need to respect that.
Give us a thumbs up, click the notification bell and subscribe for future Jatai Academy content.
I like this. I think we got the basic shape into it so now let's go through and blow it dry and see what our end results are.
Final Linda Evangelista Short Haircut Pixie Look

So here's our end result of the Linda Evangelista haircut and I think we got the texture right which I think is the hardest thing when you're working on mannequin hair or hair that's been bleached like our inspiration picture where you got to get it soft enough thinned out enough without getting wispy and I think by laying our razor flat against the section, that really generates that type of texture and that type of shape.
We got a solid shape. We got a little bit of fullness all the way around. Very very iconic of when she was doing the George Michael video with when she had her short pixie kind of hair. I like it a lot. I think that this works really really well.
So couple of things to remember: pull your sections forward, angle your fingers so you leave more weight right here around the front and then you're tapering it into the back. Also, gently fillet with the razor across each section to remove as much weight as required.
Let us know what you'd like to see in the future and please check out the Jatai Academy. There's all kinds of fantastic information on there that will make you a better hairstylist and barber. If you have a question, leave it below. We'll try to get back to you as soon as possible and again thank you so much for watching. We'll see you next time.
SHARE