Layered Lob with Wispy Bangs Haircut Tutorial
by JATAI,
23 Oct 2024
In this layered lob with wispy bangs haircut tutorial, Russell Mayes, Director of Content for Jatai, teaches some easy to understand and useful techniques for how to create a blunt bob shape but with internal texture on straight hair. This techniques used in this video are best for thick hair and not necessarily thin hair or fine hair.
Long bob hairstyles can be complemented with curtain bangs, side swept bangs, choppy bangs or in this case wispy bangs. Or you can have no bangs at all. The versatility and options are endless. Long bob haircuts can be made into curly bobs, angled bobs or layered bobs.
Lobs work with many face shapes and different hair colors. The blonde bob style is very popular on Instagram and other social media platforms. Whatever length bob you're going for, the techniques used in this video could apply. Watch this layered lob with wispy bangs tutorial and follow along with the transcript below.
Layered Lob with Wispy Bangs Tutorial:
Welcome back to the Jatai Academy. Today we're going to be doing a lob with bangs. Now long bobs with bangs can tend to get boring and look kind of broom-ish if the hairs too thick.
So I'm going to show you how to add some invisible internal texturizing to keep that from happening and also we're going to do a little whisper of a bang. So let's get started.
We're going to start with a natural or center part that's going to go all the way to the crown, from the crown to the occipital bone, occipital bone straight to the bone right behind the ear which is the mastoid.
I'm going to separate that. That's going to give us our baseline in the nape. From here we're going to separate this in half parallel to my previous parting here which is the occipital to the mastoid.
Establishing the Perimeter of the Layered Lob with Wispy Bangs

So the first thing I want to do is establish my strong perimeter shape for my lob. This is going to give me a nice clean line that I can build the rest of the haircut off of and make sure I get the sides even.
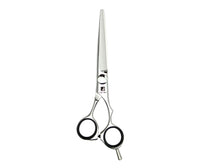
So trying to get this as blunt as possible. I'm going to go through and use my Jatai Kyoto Scissors. This is the sharpest scissor that I have and it works really really well for cutting blunt lines especially if you have really really thick hair.
So we're going to start right in the middle, comb that down clean and smooth and I like a lob that hits right about at the collar bone. So I will visualize where that's going to hit in the front because it's going to be a little longer in the front because of my parting.
And so I will visualize about right there. I keep my fingers curled down not curled up and cut this as blunt as possible. After I get that cut and I like that length I will move on to the left side and comb this T to my parting.
So there's my parting. The hair is going to make like a little T. Comb everything down and smooth. There's my line. Cut that down and through and then the same thing on the other side and as long as my partings are the same and I follow my fingers parallel to the parting and T to the part I should be able to get this pretty even on the first pass.
So after we cut both sides I'm going to comb it down and check it and I got a little longer on the left side. So much for keeping it even on both sides. So we're going to comb this down again make sure that I'm square. There it is right there. I had my fingers at the wrong angle and there we go. That should be perfect.
Now depending upon the thickness of the hair I may want to start adding texture here or building a more solid baseline. The more thicker the hair is the faster that I can start to introduce texturizing to keep it from looking like a broom.
So her hair is you know fairly medium, medium thick and so what I want to do is I'm going to go in between. So I'm going to add a little bit of texture and softness to it but not a lot. The way I'm going to do that is by point cutting. So I'm going to comb this section down, find my guide. Now I'm going to go through and point cut that line.

Now when I point cut the line I'm not going shorter than my previously cut guide. I want to make sure that the deepest part of my point cut is where my previously cut line was and then the hair gets longer from that.
I don't want to go through and recut my baseline by point cutting all the way into it because then it makes no difference if I've cut it blunt or not.
Follow us on your favorite social media @jataifeather
Point cut that on top of my previously cut guide. Be patient. Make sure it's nice and even. This is going to give me a little bit of softening and a little bit of texture and give me a transition between my blunt cut and my texture cut.
You notice that I'm cutting from the center to the front of the hairline around the face on both sides. I'm not cutting from right to left on every section. I want to cut from center forward on every section. Being patient, fine-tuning making sure I get the line just like I want.
So here's our next section. We took about an inch. We're going to continue that same size section throughout the rest of the head and that way I can keep everything as consistent as possible.
Adding Invisible Internal Texturing

Now we're going to go through and we're going to add our internal texturing that's going to be invisible to the overall shape but is going to give me a lot of internal softening and movement and it's going to bevel the shape quite a bit and that's what we're going for.
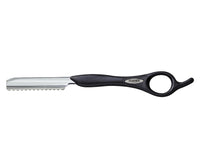
So I'm going to use my Feather Styling Razor. So now we've got our section. I'm going to go through and comb this down. I'm going to remove my baseline that was blunt cut. I have a guide from my previous section that was point cut. I'm going to hold this straight down and then from here I'm going to fillet this section and put my texture internally.
Now I'm doing about the last 2 to 2-1/2" of the section and by filleting, I mean I'm laying the blade directly across the entire section and just gently taking that off until I get the length cut.
Next section. I'll take a small piece as my guide. There we go. There's my guide from underneath. I'm going to go about 2-1/2" internally, fillet that through.
The reason I'm not going to go through and cut vertically going into it is I don't want the separation. I just want the softness that the texturizing adds. I don't want the increased movement or separation.
So comb that down. Last two inches a very gentle application of the razor. Let the motion of the blade cut the hair not the pressure that you're applying. Now you'll notice that I've left my previously cut baseline out. That way I maintain my solid perimeter shape and I only put my texturizing internally.
If it happens to cut a little bit of the guide from underneath it's not my entire baseline. It's just that previously cut section that I went through and point cut.
Okay that's looking pretty good. So now we've got a layer of internal texturizing that's going to soften up and bevel my shape.
Remaining Sections of the Layered Lob with Wispy Bangs
The next section I'm going to go through again with my Kyoto Scissors and cut a nice blunt clean line. So I will alternate the types of tools that I use by each section that I go up the head. So I can maintain a blunt lob shape but also get that internal texturizing to make the shape bevel and flow and move more naturally.
Let's go to the other side. T to my parting every section.
Let's check and see how we're looking and that's looking pretty even and I like that. We've got a nice softening effect from our first two layers of texture by the point cutting and the razor.
And now we're going to continue on as I move up the head. This section is usually where the thickest part of the hair is. It's either going to be the nape or the crown sometimes both.
And so I want to make sure that this doesn't get real heavy but also I run into the problem of I have no hair on the side of the head. So I'm actually going to use two tools on this same section.
Now I'm going to start right in the middle. I'm going to remove the previously cut hair and I'm only going to hold the previous guide in my hand. That way I comb everything straight down.

There's the previously cut guide. I'm going to take my razor, a long filleting type of stroke to take that length and weight out and I'll continue that as I start to work towards the side. Make sure I'm still holding everything at zero elevation as I cut that down and through.
Feel like I got a little shorter in there so take a little of that out. Now as I come to the ear I'm going to take where the quarter part would be and separate that out. Take a small piece as my guide. So now I have the back half of the head. There's my previously cut guide. Go through cut that length off.
I'm pretty happy with that. Now I'm going to move into my Kyoto Scissors because here I want to maintain a really solid perimeter shape and if I razor it , it's not going to have that same solidity as it transitions from the back to the front.
Comb everything down. Allow the hair to release for whatever the ears sticking out. There's my line from the back. Cut that down and through. And I can see where that would start to hit right at about where her collar bone would be. And I'm pretty happy with that.
Now I'm going to do the same thing on the other side. But I'm going to follow the same methodology that I was using before which is take my section in the center, remove the previously cut hair, only keep one section as your guide, comb that all the way through evenly down at zero elevation. There's my line. Razor that off. Okay and then follow the same thing all the way around to the side.
There we go. Last section here. Remove some the guide. I don't need all of it. I just need to know where the general length is. Comb that down and through. There's my line right there and then go through and fillet that length off.
Now I'm just going to continue to alternate blunt section, razor section, blunt section, razor section until I get to the top. And on the top, I want to always make sure I end on a blunt section that way it hides any kind of texturizing and layering that I put internally by it being blunt underneath and blunt on the top.
So the layers that get sandwiched in between they disappear. So I get the effect of the razoring and the beveling without the appearance of the razor and the texture.
Whisper or Wispy Bangs
Now I want to go through and add a little whisper of a bang. I don't want a real solid blunt bang to make it look super 60s. I want kind of a modern whisper of a bang where it looks like hair is just kind of just broken off maybe around the front.
That's a terrible way to describe it, but that's what it looks like. It's just like little whispers of something hanging out around the front. So let's go through and take our fringe section which is going to be the center of the recession to the first bump of the head and that's where all the hair has the ability and the tendency to fall in the person's face.
So here's our fringe section. Now let's go through and I'm going to separate corner to corner right across the front. Now I'm going to start right here in the middle and what I want to do is do a really extreme angle you know because most bangs are blunt or at a little angle like that.
But I want to do a really extreme angle so I'm going to take right where the hair wants to separate and take my Feather Styling Razor hold that down and start right here where I think I want my little bangs to start and then just real gently go through and take that all the way really extreme.
So I end up with just a little something here in the front but not a real solid bang. Now I'll do the same thing on the other side. Hold that down and forward. There's my little guide piece then just real gently go through and try to keep the same razor stroke that I had on the other side to hopefully that they'll match a little bit.

So I'm going to take the rest of the hair bring that down and then just gently anything that I think hangs out way too much I'm going to cut that off.
Following the same pattern that I was doing before same kind of methodology just to give me a whisper in the center more than a full-blown kind of fringe or bang. I think that's pretty good.
Now after it's dry, I may go through and fine-tune that a little bit more, but I will let the hair be the guide and show me what to do. We've got a nice solid bob lob shape that doesn't have that broom effect from the hair being too thick.
So it's got a little bit of bevel, but it doesn't really show a whole lot of texture to it because that's hidden by the top layer being real solid. And we got a... yeah it looks pretty good. I like that.
We got a nice little whisper of bang around the front, not anything too crazy. Just more like you know it just grew this way, just a natural elegance that I think looks pretty good. I like that a lot.
Please check out the Jatai Academy. There are all kinds of great information on there that will make you a better hairstylist and barber. Also let us know what you'd like to see in the future, and we will see you next time. Thank you so much for watching.
SHARE