K-Pop Mens Wolf Cut Hair Tutorial Using a Razor
by JATAI Academy,
25 Feb 2026
With all the different cut hairstyles that exist for women, some of them cross over to men's styles. The wolf haircut features longer hair with lots of texture. With feathered ends and a K-pop influence, we get a trendy look that modern men are attracted to. In this mens wolf cut hair tutorial, Russell teaches how to create this look with a razor.
Follow along with the video and transcript below.
Mens Wolf Cut Hair Tutorial:
Welcome back to Jatai Academy. I'm Russell Mayes, Director of Content. Today we're going to be doing a wolf cut for a man. We're going to do a K-pop inspired wolf cut today, which means it's going to have a lot of texture to it, and it's going to build up a lot of weight in the crown and in the back of the head.
So, it still looks longer and fuller, but has a tremendous amount of texture, and the base of it near the nape of the head doesn't get too bulky. We're going to show you how to apply the texture with the Feather Plier Razor and get the perfect amount of texture that looks intentional. So, let's get started.
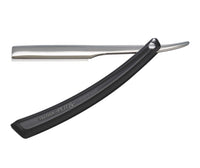
So, I'm going to start with my Feather Plier Razor. Now, I like this razor because it doesn't have a guard and it gives me the most precision and control over my cut line and exactly where and how much texture I can apply. With the sharp bare edge, we can get clean precise cuts.
Channel Cutting the Length

So, I'll start in the nape here. I'm going to hold everything straight down at zero elevation and I'll go through and channel a section and then cut my length at the same time. So I will go in deep, try to cut a pretty good little pointed jag into it and then cut the length off. So I don't move my left hand at all when I'm cutting this. That way I can be assured of a fairly straight line.
But because I'm going through and putting the texture in at the same time, this will save me a lot of time of having to go back in after I've already cut my perimeter shape and go back in and texture it. It does everything in one step.
Now, I find that if I'm doing a very highly textured shape like we're doing today with this wolf cut, I will not go through and cut everything blunt with a pair of scissors and then go back in and try to create texture.
Once I cut a blunt line into it, it's very, very difficult to go through and get the amount of texture that I really need to make this haircut pop. So, I basically end up going through and over texturizing the blunt line to try to get my separation and pieciness.
Whereas, if I just go through like this, add my texture and the cut with the razor at one time, it's easier, it's less effort, and I can actually get a better, piecier result. So, here I'm moving up to my next section, holding everything straight down at zero elevation again, finding my guide from underneath, and going through and channeling and cutting it the same.
And I'll go through and repeat this whole methodology up the entire back of the head until I get all of my lengths cut. I've gone through and started with a basic sectioning where I've sectioned down the center front half from the back half and then from just above the occipital bone to above the mastoid right behind the ears.
Cutting Anti-Head Shape

So, after I've gone through with my basic sectioning, I'll start at the nape, get my baseline, and work that all the way up until I have the whole back half of the head finished. Now, I'm going to go through and take a center section, hold everything straight back, everything just pulled straight back through here. And then I'm going to cut a straight up and down line.
I'm going to go through, determine what length I want my shortest layer to be, hold that straight back, and cut a straight up and down line.
So, what this will do is this is actually cutting it anti-head shape. Head shape would be the same length from top to bottom. So anti-head shape is leaving it longer at the top and then shorter in the middle and then longer at the bottom.
So this will give me a little bit of graduation that you see right there in the back. Right there how that starts to curve and give me that graduation pop. So I get that fullness from my graduation, but then it allows the hair underneath it to collapse and not get bulky.
Now I'm going to walk my guide over to the left. So, I'll take my center section, add a horizontal section on the left side, pull everything into the center of both of those sections, and then follow my guide, cutting straight up and down again.
But, as I was talking before about collapsing the nape, by pulling everything at the anti- head shape like this, it will elevate the hair underneath and allow it to collapse. So I don't get that very overly bulky hair right at the nape.
It ends up being bulky or fuller right around the back of the head in the center like around the occipital bone. So I get that fullness and it still feels like I got some hair but it doesn't get that mud flap kind of look that you see a lot of those rednecked mullets have.
So now we're going to go through and finish our next section. So, we've got section two and section three. I took out my center section. Now, I'm walking my guide over, and I'm continuing to pull everything straight back, you know, parallel to my previous section. Straight back. There's my guide underneath. And we're just going to go through and cut this.
Now, the thing is, when you're cutting with a guardless razor, I need to be respectful of the blade. I can touch myself and it won't cut me. It's when that blade touches me and then moves left or right, that's when I start to really cut myself. But I still want to be respectful of this because these blades are very, very sharp, which makes it easy to go through and cut.
But it's too easy to go through and cut myself if I get sloppy with it. There is no other tool on the market that will give you this type of look and this type of texture and result. So, I have to learn to respect the tool and then I can use it and get its maximum potential.
Last section here. Pulling everything straight back. Making sure all of it blends through with my layering. And I'm going to do the same thing on the other side.
That's looking pretty good. Now, here's the entire back finished. I have a nice amount of layer through the back. I get a little buildup of weight right there around the occipital bone, and then everything else under it collapses and flips. And that's the look I'm going for is this kind of flippy piecey kind of wolfy type of shape.
Cutting the Front for Movement

So now we're going to section off high on the recession on the side of the head. I'm going to take an angle diagonally back that's going to be parallel to my hairlines. I'm going to pull this forward and then cut it back. So the line is actually kind of straight horizontal, but by me pulling it forward, that's actually going to introduce movement and force this hair to flow back.
And you can see right there how it starts to make that hair swing back. So by pulling it forward, I cut the front slightly shorter than I cut the back. And by putting my angle into it, it ends up being a much more horizontal line, but I introduce all of that movement into it.
Now, I'm not trying to insert my texture and cut the length here at the same time. I just want to focus on cutting my length and cutting the shape because it's going to be hard to go through on this type of methodology and insert texture and cut the length at the same time.
It's easier to do horizontal when I start angling things like this. I want to do it in two steps. So, I'm pulling everything forward, cutting it about right to the tip of the nose, and then angling that back. Once I finish all of this here and I get everything cut to the length that I think I want, then I'll go through and start taking a section in the back of the head and angling that down into the nape.
Blending the Front with the Back

So, I'll section off the top and the back here. And then angle. This angle here is going to be parallel to the first section that I took, which is going to be parallel to my hairline right there behind the ear.
Now, we're going to pull this straight out from the head at 90° using the length that I established by pulling everything forward. Then, I will go through and cut that straight up and down and blend that into the length in the nape of the hair.
So right there, just pulling everything out. I don't have as much hair to cut here because I've already cut the length and I've already cut my layering. This is to make sure that the sides and the back blend together. We'll check that. See how that's looking? I like that. That's pretty good.
So now I'm going to continue on doing this same type of sectioning all the way to the center of the back of the head.
So continuing parallel sections to my previous section and then holding it straight out to the side of the head. So I'm basically cutting a big box type of shape where it's got a corner right there behind the ear. It's got a corner on the other side and it's got a corner right in the crown. Oh, we missed that little part right there. But there's not much to cut so we'll leave it.
Now we're going to get to the center. Pulling everything over. Making sure nothing really hangs over. This is just making sure that everything kind of blends through. Not a whole lot to take through here. So, being very careful, very judicious with my cut and just making sure everything blends through.
Now, in the beginning when I went through and took my middle part and then I sectioned off the front of the head from the back of the head and then the nape section out. So this is my quarter part back blending. That's a mouthful right there.
So what I'm doing is the section that I cut underneath vertically at the ear to make sure everything blended from the sides down into the nape. Now I'm taking the back half of the head on top and making sure that that blends through with the hair that I've cut underneath.
I don't want any hair from the top hanging over and being disconnected from the hair underneath. I want this all to blend through perfectly. We got all that blended through there.
Layering from Back to Front

Now, we're going to go through and take a center section. This is a mohawk section from the front all the way to the back. Right there at the crown, I'm going to use that length as the guide for my layering. I'll pull this straight up. Cut this 90° from the head. And working from back to front. And I want to just cut this all the same length going from back to front.
When I'm doing this type of layering with a Plier Razor, I have to be mindful of my sectioning. And one way that I can go through and apply this cut line cleanly without being worried that I'm going to cut myself is I have to make sure the hair that's holding the hand is gripping it for life. I mean, it's got a death grip on that section so it doesn't fall out.
And then when I apply the razor to this section, gently applying it using the razor motion of up and down to cut, I can go through and cut nice and clean lines without worrying about cutting myself.
After I cut the center section, I'm going to take my next parallel section, working to the side, hold those two sections up into the middle. There's my guide from underneath. There we go. There we go. Perfect.
And then I'll go through and blend everything through. Anything that hangs over past my guide, I'll cut up. I got a death grip on my section there. This takes a little bit of practice.
I would really recommend that before you start layering hair with a razor like this that you take a mannequin head, you practice, you get comfortable with it, and you do it very methodically and very slowly. Don't try to move fast. Moving fast is the enemy of cutting clean sections and clean hair. there
My last section. Everything blending through onto the right side of the head. Anything that hangs over from the top, I'll go through and just cut off. Methodically working that through. There we go. Very little to cut there. I think I got a little bit. There we go.
Give us a follow on your favorite social media @jataifeather
Razored Bangs

After I finish everything on the right side, I'll do the left side. And now we're going to section off the hair around the front. I'm going to pull the center of that right down to the tip of the nose. And I'm going to go through and razor that length off. That's the length I want my fringe to be. So I'm pulling that straight forward. Cutting that the length I want.
Now we're going to split that in half. I'll take the entire right side of the head through here. There's my length that I cut at the sides and I'll blend that through with the little short piece that I cut right there at the front center of the face. Work that all the way through. Blend that all the way through. There we go. Perfect. Just like that.
Now, going a little shorter in the middle is going to leave it a little longer towards the side. Wherever hair is shorter, it will move to where hair is longer. There's my length right through there. There's my guide. There it is. Right there. Now, we're going to cut that through. So, shorter hair always flows to longer hair.
So if I want to create movement, cut one side shorter and the other side longer. And also because of the razor motion through here, because I'm razoring it from the center to the sides, that will introduce movement as well.
Now in the back, I applied texture and length at the same time. Around the front, I couldn't do that. So now we're going to go through and add our texture and thinning around the front.
These mannequin heads can get a little thick and sometimes your client's hair is very very thick and you need to go through and add more texture than you think that it needs. There are other times where the hair is a little bit finer where you don't add as much texture. So, you have to use your own discernment to apply the amount of texture that the section needs.
Every person's head is going to be different. Every hair texture is going to be different. And this is something that will come with experience of you practicing.
Adding More Seamless Texture

Now, we're going to go through and just start applying a little bit of texture all the way around the front half of the head because we've already applied it in the back and we won't need that there. I will go through and check it to make sure, but we want the same type of texture throughout the entirety of the haircut.
Going through and just methodically applying a little bit of texture here or there or wherever it needs it. There we go. Perfect.
Now, as I start to move in the back here, you can see it's already got pretty pretty good amount of texture. So, I don't need a whole lot through there. Maybe a little maybe not. Yeah, right there. That's looking good.
Now, we're just going to go through and do this same type of texturizing throughout the rest of the head, throughout the front of the head (not the back, because we already did that) until everything matches and it blends seamlessly, not only from a length point of view, but also from a texture point of view.
I did go through and change the blade about halfway through this haircut. Some types of hair dull blades faster than others, and it usually tends to be the thicker, coarser types of hair that will dull the blade faster.
So, I don't want to go through and start pushing hair and not end up with a clean line. So, if I need to change a blade, I'll change a blade. I know some stylists that will use the same blade for years. And I'm telling you, your haircuts are going to suffer from it.
Final Mens Wolf Haircut Look

Here's our end result. And I think it's looking pretty nice. I'm checking everything to make sure our texture is good. And there we go.
This is our end result. And I think we're looking pretty good. Got a lot of great texture to it. And I think by pulling it straight out in the back, it gives it this nice fullness in the back, but we can still have it hyper layered underneath. It doesn't need much styling if the hair is cut right. Razor cut haircuts can do just that.
So, we got a lot of texture to it and a lot of separation. And I don't know how these guys wear this hair in their face like that, but they do. That's the style. And this is very reminiscent of what you would see in in K-pop right now over in Korea with a lot of the really hyper trendy guys.
And I think that it adds something. It adds some softness with having long hair, but it still keeps its style without being super messy. And this works really well on wavy hair or loose curl hair. I probably wouldn't do this on the curliest of hair. And I think that this would work really well on finer textures of hair, maybe not as much texture as we've done here.
Please check out the Jatai Academy. There's all kinds of information on there that will make you a better hairstylist and barber. Let us know what you'd like to see in the future. You have a question or comment, please leave it below. Thank you so much for watching. We'll see you next time.
SHARE