Choppy Short Layered Hair Tutorial
by JATAI Academy,
03 Oct 2025
Choppy short layered hair is popular hairstyle among older women but it can be modernized for younger looks. Short layered haircuts are not necessarily easy to do. Choppy layers can tend to look lumpy if done improperly and can really stand out if done on thick hair. Short choppy haircuts are a type of layered bob that's textured. While not a pixie cut, they are short hairstyles that have a lot of style and can compliment the face nicely. Watch this short choppy layered hair tutorial and follow along with the transcript.
Choppy Short Layered Hair Tutorial:
Welcome back to Jatai Academy. You've seen a choppy bob. Well, we're going to do some chop graduation today. Chop graduation is a little more difficult because you have to worry about the graduation starting to look lumpy. And lumpy graduation always looks bad.
So, we have to apply the right amount of texture in the right way. Section it so that we can avoid that. We're going to show you how to do all that as we get started and I'm going to blow it dry without using my hands at all. Only the power of the blow dryer.
Back of the Head

So, let's get started here in the nape. We're going to take a section across and split the top from the bottom. Then, in the center, we're going to take a diagonal section. And I'm going to hold my scissors out behind on top of my fingers and just go through and cut whatever angle of graduation that I want.
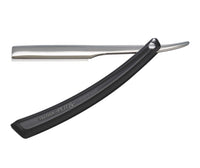
Using that as my guide, I'm going to use my Feather Plier Razor, which is a razor without a guard. It gives me the most control and has the sharpest blade. This is the limited edition white. And so get them while you can.
So I'll start and follow the guide that I did in the center with the scissor. And I'm going to alternate scissor and then razor. So this section here, I'm pulling out the same angle of elevation, following the same angle of graduation. And I'm gonna go through and just chop that line in with my scissors to get my graduation into it.
Now, I'm not trying to be real precise with this. Each section that I take, I'm going to alternate. So, this section, I'm going to follow the guide and use my razor to go through and chop the section. So, each section is going to fluctuate between more texture and softness and more texture and structure.
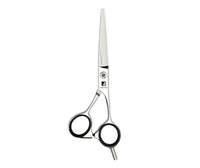
This is my Tokyo Scissor from Jatai. It is the longest blade I have at 6 inches. It has a nice point. It's very sharp. And I like the longer blade for doing this technique because on the opposite side, it makes it much easier to cut on top of my fingers like I'm doing now.
Here, I'm going through and using my Feather Plier Razor to go through and put my chop graduation in. Now, typical, you know, school of thought is that if I do this, it's going to be really, really lumpy and look really, really bad.
But because I'm taking very, very thin sections and I'm elevating it at a higher level of graduation, it makes a much smoother blend. So, I can get that texture from chopping into it without it being very, very lumpy.
Now, on the other side, you can see why I like a longer scissor. It makes it so much easier to cut on top of my fingers to make my choppy graduation blend at the same angles. And that I'm cutting from the top down.
I'll do the razor exactly the same on the other side, just keeping my choppiness as even and as consistent as possible. After I finish the underneath, we're going to move on to the top of the head.

I'm going to start at the same angle for my partings and I'm going to try to elevate at the exact same angle that I did underneath using my razor following the same method of keeping a short little choppy stroke so I can start to build the weight of the graduation without too much weight that I start to create lumpiness here. Going in with my Jatai Tokyo Scissor and going through and putting a little choppy graduation into it as I work from top down.
And each section that I cut, I want to comb it and see how the weight distribution is and make sure that my graduation is consistent because this is purely a visual type of haircut.
Though I'm sectioning it technically and I'm elevating it technically, my cut is purely visual. So, I have to check it a lot along the way to make sure that I can get both sides even and that I get a consistent type of graduation because it's real easy to get this really really inconsistent and then it starts to look bad.
Sides of the Head
Working from the back of the head into the side of the head and I will just follow and build each section coming from the back into the sides.
Now, you'll notice that when you're doing short graduation like this, it's going to start to stack up in the nape. And then as I get to the edges around the ears, it's going to start to build up a little bit more weight. So, that's where I'm getting that bob shape from on the sides.
Following through, not trying to be real precise, just trying to be real consistent. And this is one of those haircuts you just have to build it and look at it each step of the way.
Still alternating between the razor and the straight scissor just to get a variation in my texture. When I did this type of shape with a bob, it's a lot easier because you don't have to worry about the weight distribution and you don't have to worry about the blend as much because when you're dealing with one length, once you get that shape in on the bottom, you don't have to worry about seeing the choppiness of it other than it flicking out the separation on the bottom.
So here, just being patient, working from back to front and trying to build my shape visually. If I need to fine-tune it, I'll fine-tune it. Like that little piece, I thought maybe it was a little heavy, but we'll see. I may fine-tune that a little bit more as we go.
Pulling out. Following my guide from underneath. Keeping my scissor and my razor stroke as consistent as possible. There we go. And I like where that's starting to hit on the jawline. Now, from here, I got my last section. I'll take a little bit of the previously cut hair as my guide as I start to work into the sides.
I want to make sure that as I start to apply each new cut that I'm using the guide and not recutting into the guide. That's a difficult thing. So, it's okay to not be exactly on top of your guide as you're working this shape.
That's why every time I finish a section, I want to comb it and see how it fits. Now, we're going to use a little bit of Jatai Blade Glide to make sure that the blade of my razor slides through the hair a lot easier and gives me a very, very consistent result. And I'll use it mostly when I'm doing internal texturing with the razor.
Removing Weight

And I'm going to go through, pull out each section, and with my Feather Plier Razor, just go through and as delicately as possible, go through and channel cut to remove some of the weight because these mannequin heads have a lot of weight. I want to maintain that corner in the front.
That's why I keep pulling that out and showing that corner. I don't really texturize that much or remove that much weight. I want to keep that solid.
Here's a good angle to see how I'm trying to apply this texturizing very very finely and judiciously so I can remove weight more than creating separation.
You'll notice that I tend to close the blade in between taking sections and that just gives me a little extra protection and make sure that I'm respecting the blade so I don't cut myself. And just continue to work up until I run out of hair.
Be sure to follow us on your favorite social media @jataifeather
And here, I'll just continue to visually remove as much weight as I feel needs to, to help that hair kind of lay down and not get too puffy and bell-like in its shape. I think that when it gets too bell-like, it tends to look a little dated, even though this haircut has a lot of modern texture to it.
Blowdrying
Now, when I go to blow this dry, I first started just using the blow dryer to go through and start getting some aeration in it and getting some volume to it. And I think it started to look really good. So, I just used the blow dryer and that's all.
I didn't use my fingers to stretch it out. I didn't do anything other than on the bangs. I kind of blew the bangs down with a little bit of a brush to make sure that they're smooth.
But everything else is just using that blow dryer to get volume and allow the hair to naturally separate and get the texture that I've built into it by applying the structure of the haircut.
Then just a little finger styling to make sure that everything pops and it shows the texture like we want and that I don't have anything that I need to fine-tune.
Final Look

All right, here's our end result. And I think that uh I think that that looks pretty good for not using my hands and it blowing it dry and just letting the blow dryer do the work. And I think it really shows off, you know, kind of this choppy graduation cuz the fear you got to get over is doing a graduation that looks lumpy.
I want it choppy and piecy and have a lot of separation, but I don't want to look lumpy and poorly done. That's going to come from how we angle our fingers and how we consistently apply our scissor layer with our razor layer and then fine-tuning it at the end.
And I think we look pretty good. I think this is a nice interesting way to get some texture and a little more fullness and have a little bit more pizzazz to it, so to speak.
Anyway, check out Jatai Academy. There's all kinds of fantastic information on there that will make you a better hair stylist and barber. Also, let us know what you'd like to see in the future. Thank you so much for watching. We'll see you next time.
Short choppy hairstyles are haircuts women gravitate to when it comes to short hair. While choppy short layers are popular with women over 50, they can be modernized for younger looks.
SHARE