Brad Pitt Hairstyle in Se7en Tutorial
by JATAI,
18 Jun 2025
Let's explore a Brad Pitt hairstyle. But which one? The famous actor has had many hairstyles over the years and has sported distinct styles in movies like Fight Club, Fury, Mr. and Mrs. Smith and Inglorious Bastards.
His red carpet looks from his days with Jennifer Aniston and Angelina Jolie have always been of interest to fashion gurus. And his hair is versatile making him a great candidate for a variety of looks.
In this tutorial, we dissect the Brad Pitt haircut from Seven, a 90s oldie but goodie. Follow along with the video below and follow along with the transcript.
Brad Pitt Hairstyle in Se7en Tutorial:
Welcome back to Jatai Academy. I'm Russell Mayes, Director of Content. Today we're going to be doing a study of Brad Pitt's short haircut that he had in the movie Se7en.
It was one of my favorite looks that he had because it wasn't a real polished look. It was a little more lived in, a little more raw. So we're going to study how to get that raw look but still have it look like it is a complete and well done haircut.
So let's get started. So in the movie Se7en Brad Pitt plays this young rookie detective and he's teamed up with this veteran, you know, detective to show him the ropes. So you can kind of see in his character that he's young, he's new to the job, he's new to the gig, he's learning how to do everything. And that's reflected in his style as well.
He's not real polished in his clothes. They're like they fit but they're not real expensive and also you can see that especially in his hair because his hair is this young raw kind of cheap rookie detective haircut. It's not real polished. It's not real clean. It's literally the opposite of Miami Vice that was glitz and glam and perfection.
And now you're seeing Brad Pitt who's usually impeccably dressed with perfect hair, because the dude has great hair. In this movie, his hair is a little lumpy. It's a little raw. It's a little disheveled. It's not polished. So I'm going to try to repeat that basic shape and keep that rawness to it without it looking like it's a cheap terrible haircut.
To get started I'm going to go through and separate the top from the bottom. We're going to take a recession...center of the recession straight back to the quarter part, quarter part's going to go down to the drop crown which is between the occipital bone and the crown. It's that little bump right in the middle. That is basically the parietal ridge that I'm separating the top from the bottom from.
Scissor Over Comb

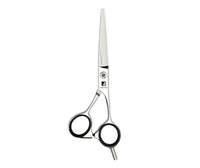
Now that I've got the top separated from the bottom, I'm going to go through and do some scissor over comb. I'm going to use my Jatai Tokyo Scissor. This is a 6-inch scissor with a nice even blade all the way through. It's not a real heavy blade so it doesn't tire out my hand by doing a lot of repetitive motion, but it still has a nice sharp blade and a good clean point to it.
So we're going to start here on the side and in the movie I noticed that his hair was tapered closer here in the front and it was a little longer in the back. So that's what we're going to do.
I'm going to angle my comb here. I'm going to start real low and just crudely go through scissor over comb. I'm not taking a whole lot of strokes just yet. I just want to go through and get my lengths proper to where I think that they should be. This is still going to be a little tapered.
So we're going to go through and feel it out and get everything where I think that should be. And I think that that's probably a pretty good length. I'll probably take that a little shorter right through there and then I will continue to work this back.
After I've got to the mastoid I'm going to go to the back of the head, the nape of the head, and I'm going to start here at the bottom. I'm going to leave a little bit more length than I did on the side and taper that up. It's not a real steep taper but it's still tapered a little bit nonetheless.
Now once I come to the point where the mastoid is, I was cutting the side going up, I was cutting the back going up but because of the way that the angles are on the parietal ridge now I'm going to come in at an angle like this and work that up and out and through. So I'm working my tapering parallel to my parting.
Okay now I'm going to go through and separate in the back. I'm going to take from the crown to the high point of the ear and separate the front from the back. And I'll go through and take a center section and I want to continue the angle of tapering that I've already started from underneath as I get longer towards the crown.
Blending the Sides and Back

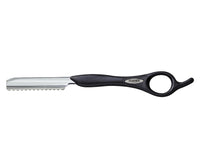
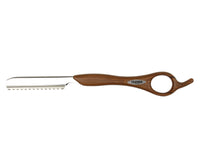
So I'll take this section right in the back in the middle using my wood-look Feather Styling Razor limited edition, by the way. This gives me enough texture to keep everything soft and allow me to fine-tune it here later on. But it also can go through and cut a nice clean shape.
I'm going to pull that out. There's my length from underneath. Go through and continue that angle straight up. I'm not worried about this length being right because I'll cut that with the top.
All I'm looking for now is to blend this into the back. I will pivot from the crown. There's my pivot angle. I'll pull this out from the head at 90. There's my line from underneath and my previously cut guide.
I'll go through take that length off and make sure that we have a nice little blend through there. Pivot again as I start to work towards the side. Remove the center section. Now I only have my second and third section. Going to pull this straight out from the head. There is my line from underneath. Going to take that out, remove my second section.
Now I have my third and my fourth on this side. There's my length from underneath. We're going to go through blend that through. Now let's go through and work on making sure that the sides blend.
I'm going to go through and take a parallel section to my previously cut section which was halving the parietal ridge. We have this length here so I'm going to pull this straight out from the head using my razor. There's my length underneath and cut this using that length as my guide from the front all the way to the back.
Follow us on your favorite social media at @JataiFeather
Next section. And I'm gonna keep going through and following this methodology until I get to the center of the head and then I'll go through and do the same thing on the other side.
We've got everything blended through with our sides and the back and I think that we don't have to worry about any hair hanging over that looks funky but the top is still too long for the shape.
Blending the Top

So what I want to do is go through and cut the top, but I want to cut it as inconsistent as possible without being completely out of shape so what I'm going to try to do is just use my fingers to put in, pick up and then cut anything that hangs out over my fingers off.
Lift this up, put my fingers in, try to find that length that I want and then go through using my Feather Styling Razor and just start cutting anything that hangs out over my fingers off.
This is going to be very crude and very raw. And I may have to go through and do it a couple of times. But this is how I'm going to start getting that really crude shape on top and I'm not trying to cut everything at one time.
This starts to give me my guide length and now as I start to look at that front, that's looking more like the photo. He's looking like a detective more and more.
Another way that I can go through and cut this, pull back. There's my length. I'm going to lay my finger against the flat part of the blade and anything that's really long I'll just push into the blade and cut that off.
After we got the front, I'm going to go through and take a little more here. Hold this up in my fingers. There's my guide from the front and then we're just going to go through take this off. I would probably use the regular blade as opposed to the R-Type Blade to give myself a little bit more protection.
And I'm not jamming this into my hand. I'm just running it across the top of my fingers. So it's starting to crudely cut the shape, but not real cleanly.
So take your time and be patient. It's a technique that requires a little bit of patience.
So let's work this a little bit more internally and take some more of this weight out in the crown. So I'll pull out, go through, channel cut some of that because I want some weight removal and some separation.
Continue to go through and channel some of this out until I feel like I got the weight and the length like I want here in the crown.
I think that's looking pretty good. So now let's go through and blow it dry and see if I need to do any texturizing on the top.
I like the length that we got on the front. I think that that's looking you know pretty good through there. I like the length on the sides and the back down through here but we need to take a little bit more out through the ridge here because this shape is a little beveled and rounded off.
Thinning & Removing Length

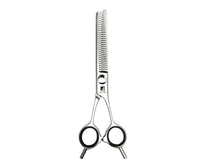
So I'm going to go through and use my Jatai Tokyo Thinning Scissor. Now this is a nice clean middle of the road thinning scissor to take out some weight.
The more times that I hit it, it will start to remove more length so I'm going to go through and thin this ridge out a little through here and I'm going to thin it a lot but I'm going to thin it on the end so I can take some of that length out and bevel the shape a little bit.
So we're going to start low here. Make sure that my straight blade is on the bottom. Start at the bottom. Get the motor running and then go through and work that up and bevel my shape a little bit.
The more that I do this, the cleaner that the shape is going to be. Now you don't want to necessarily go through and give a really really crude haircut on your client but you still want to keep that kind of rough and raw texture to it.
So there's a fine line that I'm walking here between how much of this shape can I make it crude and how much of it needs to be clean and presentable and even. There we go. We're going to take some of that out through there. I like that better. Take a little bit of clay.
Brad Pitt Hairstyle from Se7en End Result

Alright, here's our end result. I think we're looking pretty good. I think we got the texture right. I think the lengths are pretty good and it still has that kind of rawness to it that I think he had in the movie and so I'm pretty content with this.
I'm pretty happy with that. When you're going to do the razor texturing on the top like I did where you're going across your fingers, make sure you turn the blade away from you as you're going across.
If the hair is real thick it doesn't work too well. So just take a mohawk section and pinch it off like the other technique that I showed you if the hair is really really thick. That works just as well and it will give you a very very similar shape. I think you're looking pretty good. You're ready to go catch some criminals, but don't look in the box. Don't look in the box.
Check out Jatai Academy. There's all kinds of fantastic information on there that will make you a better hairstylist and barber. Also let us know what you'd like to see in the future and thank you so much for watching. We'll see you next time.
SHARE