Bixie Haircut for Fine Hair Tutorial
by JATAI Academy,
03 Jun 2026
What is a bixie cut? A bixie is a bob an pixie cut mixed together. The style is a modern take on short hair that's easy to wear with natural movement and volume. It compliments different face shapes and is a popular cut done in the salon. Minimal products are generally used. In this video we take a look at a short bixie haircut for fine hair. We look at different considerations when dealing with fine hair and recommendations on how to address it.
Watch this tutorial for how to do a low maintenance bixie haircut for fine hair and follow along with the transcript below.
Bixie Haircut for Fine Hair Tutorial:
Welcome back to Jatai Academy. I'm Russell Mayes, Director of Content. Today we're going to be doing a bixie haircut specifically for finer hair types. We're going to show you how to maintain the most thickness and fullness, but still get that iconic bixie shape with the razoring around the front. But we'll show you how to judiciously apply the razor so that you don't end up over texturizing it and taking all the weight out of it. So, let's get started.
Square-ish Graduation

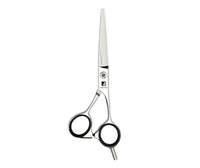
Separating the nape in the back. And then we're going to take a center section, separating left to right and top to bottom. I'm using my Jatai Tokyo Scissor, a 6-in scissor. I like this one for doing really tight, clean fitting work where I need a skinny pointy blade to be able to dial in exactly what I'm doing. It's a nice sharp blade and it lasts a long time. And this is probably my most used scissor.
We're going to start with a center section, pulling that straight out from the head. And then I will cut a 45° angle into it. And I'll start to walk that guide from the center over to the right. I'll hold that out straight from the head, 90° from the head, cutting a 45° angle into it. Longer at the top, shorter at the bottom.
I'll remove the first section that I took. Now I have my second and third section. I will hold those two together in the center of both of those sections. Hold it out 90 from the head and then cut my 45°ish angle into it following my previously cut guide.
So, this is going to give me a walking square-ish graduation where the graduation is the same in the center of the head as it is the same as it gets closer to the ear. So, it's not triangular where it's shorter in the center and longer towards the ears.
This is keeping my graduation all the same straight across the back. I'll continue to walk my guide until I get to the ear. And then I'll comb everything down and cross check it to make sure everything blends smoothly and cleanly. Now, right there at the bottom of the nape, I couldn't get my fingers tight enough. So, I'm taking that very first section right there, shorter, and tightening that up right at the very hairline of the nape.
Now, I can control how long and how steep I want this graduation based upon how fine the person's hair is. The finer it is, it will usually respond better to a lower angle of graduation as opposed to higher.
Beveling and Point Cutting

Now, we're going to go through and take my first horizontal section that's going to parallel the first section that I took, which was the occipital bone to the mastoid.
I'm holding it at that elevation, which is peak curvature of the head. So, I'll lay my comb right at the parting, hold it at that elevation to continue to bevel my shape, and then I'm going to deep point cut this. I want these point cuts to be very prominent. I'm not going to go through and really whisper all these point cuts in there.
The reason for that is if I make that point cut much more defined and definite, I'll have a little bit more solidity and weight to it as opposed to it just completely meshing all together. So, I'll be able to see the texture and the separation without removing so much weight.
I'm going to follow along with my next parallel section as I work up the back of the head. Starting in the center again and then holding it off at this elevation right here, peak curvature of the head.
Now I'm continuing on with the same method I was doing before of making a very defined point cut as I hold it out at the peak curvature of graduation.
By holding it out at that peak curvature, not only do I continue my graduation that I started from the bottom, but it bevels the shape a little bit. So I'm actually cutting a curved line into it, if you were to hold this out and cross check it. I'll continue on now.
At this point, I don't hold it at peak curvature because as the head starts to go up and round, I want to maintain some weight. So, I'm holding it at the peak curvature of the parietal ridge, which is right there at the drop crown. And it's kind of, the parietal ridge is that area that they measure your head if you're going to get a fitted hat. It's uh the top of the recession and the bottom of the recession around the front that continues in a horse shoe halo shape all the way around and it separates the bottom of the head from the top of the head.
Just continuing to work that until I run out of hair section by section as we work from the center of the back towards the front of the head. Here we go. We get a very nice clear shot of there. Making strong, diligent, defined point cuts as we're going through. Very little needs to be cut off. So, we're cutting very little.
Razor Cutting Around the Face

We're gonna take a section right around the front. I'm gonna hold this forward, and right there at the eyebrow, I'm going to cut a really, really steep line going from short to long. The long being right there where my little bob shape was. And I'm curving that shape forward. Now, we're going to go through and etch some of that out to make that hime piece right there at the front more defined.
So, that's going to separate that piece because it's not going to blend in with the bob shape so much and it's going to pop out.
Now, we're going to take the next section behind it, which is parallel to the front section, but I'm going to completely ignore my guide from underneath. I'm going to pull this forward and right about the tip of the nose, blend that from shorter to longer, not cutting into my guide of the bob length underneath.
But I am creating a new guide at the top of the section. The next section I'll pull forward exactly the same as the previous section and cut from the tip of the nose down to my length. So that's going to give me that beveling around the front and the appearance of it being shorter without actually cutting the entire side shorter.
Curtain Bangs

Now, let's go through and separate the top of the head. I'm separating right at the very front, which is going to be my bang piece. I'm going to pull the center out. Cut my shortest piece right there. I like to cut it a little shorter than I feel comfortable with to force that curtain bang to really pop.
After I cut the center, I'm going to comb everything else forward and down and cut my overall length of where I'm going to. So, I have where I'm coming from right there in the center, which is my short piece. I have my going to, which is my long piece right there at each corner of the hairline, right around the front where my bang section is. And I'll go through and blend short to long.
This is a very very steep angle and it requires a little bit of time to make sure everything fits in nice and perfectly and gets that short hair pushing longer hair movement that's really really iconic for a curtain bang. Shorter in the middle pushing to longer towards the edges just like that.
Taking our next section here now completely ignoring underneath and just go through and razor some of this hair off. I'm just choosing a completely random guide about the tip of the nose. I'm not using that short piece where I started my curtain bang underneath. And I'll go through and point cut this where I'm not necessarily just point cutting the tip, but I am cutting a channel in it where it's going shorter from the center, longer to the right, and then shorter from the right and longer to the center.
So, I'm actually going through and cutting these real steep angles internally in the section to cut all of that length off that I don't want. I'm completely ignoring the sides, completely ignoring the underneath, and allowing this hair to hang over.
I can fine-tune it as I need to as the hair starts to get more and more cut. And I see how the shape is developing.
Follow us on your favorite social media @JataiFeather
Separation and Weight Removal

Continuing on, just following the same methodology, channel razoring some of this out to get a lot of separation and some weight removal. Now, because I'm going through and removing weight specifically around the front and on the top, that allows me to leave the weight on the sides so I can still have a thicker, fuller shape.
And this works extremely well on finer hair textures. Disconnections work well, especially when you're trying to get something that's very, very textured like this shape is.
Now, from here, after I've cut the front and I've got everything like I want, that's completely disconnected from the sides, I'm going to go through and take a center section on the top. I'm going to pull this straight up in the air. And then I'm going to go through and take some of that length out so I start getting more of a pixie shape on top.
Going from back to front, keeping everything nice and short. I will probably cut this shorter than I feel comfortable because I want it to pop and I need that those shorter layers in there to make that pixie really really pop.
After I cut my center section, using that as the guide, taking my next section on the left side of the head, holding that into the center of the head, keeping the same razor stroke that I was using, the more consistent that I can keep the razor stroke, the more consistent my end results are going to be.
Now, right through here, I'm starting to run out of hair. Now, we've got uh our last section right here on top. I'm not going to continue to pull the sides up, only the very, very top section that I was cutting my pixie on. I'm leaving the sides to be my bob shape.
So, it's really actually two haircuts. I got a pixie on the top of the head and I got a bob underneath. Now, they both have a little bit of texture so that allows them to blend. And as long as I keep it fitting the head properly, everything's going to blend nice. Check everything out. Fine-tune as needed. And this is looking pretty good. Let's blow dry.
Bixie for Fine Hair Final Look

Here's our end result. And I think we're looking, you know, I think we're looking really good. I like this shape. I like the fact that we've got this bixie kind of top in front, which is really the iconic part of it where you get this little pixie top and then you have this bobbed shape in the back. Most pixie bixie haircuts, they're going to pixie it from the front and then bob it in the back.
So, what we're doing is we're bobbing it underneath and keeping the pixie on the top. So, I think we still get this iconic kind of razor bang. We get this little hime piece right here on the side, which I really like. And we still maintain a nice amount of fullness in the back. So, we can still get that graduation and that pop and stack.
You can remove as much hair as you need or you can leave as much hair as you need depending upon the client's hair texture and thickness and density. So, give it a shot. Add this to your repertoire and I think it will open up a world of possibilities for you.
Check out Jatai Academy. There's all kinds of fantastic information on there that will make you a better hair stylist and barber. Let us know what you'd like to see in the future. Thank you so much for watching and we'll see you next time.
SHARE