Filter and sort

60 products

0 selected
$

0

$

675.00

0 selected
0 selected
0 selected
0 selected
0 selected
0 selected
0 selected
0 selected

Jatai Tool Case for Shears and Razors

JATAI Tool Case

$30.00

Feather Switch Blade Shears 4.5

Feather Switch Blade Shears 4.5"-7.0"

$89.95 $62.97
Option Selector
Feather Kaiden Shears 5.5

Feather Kaiden Shears 5.5"

$229.95 $124.95
Jatai Razor and Shear Stand

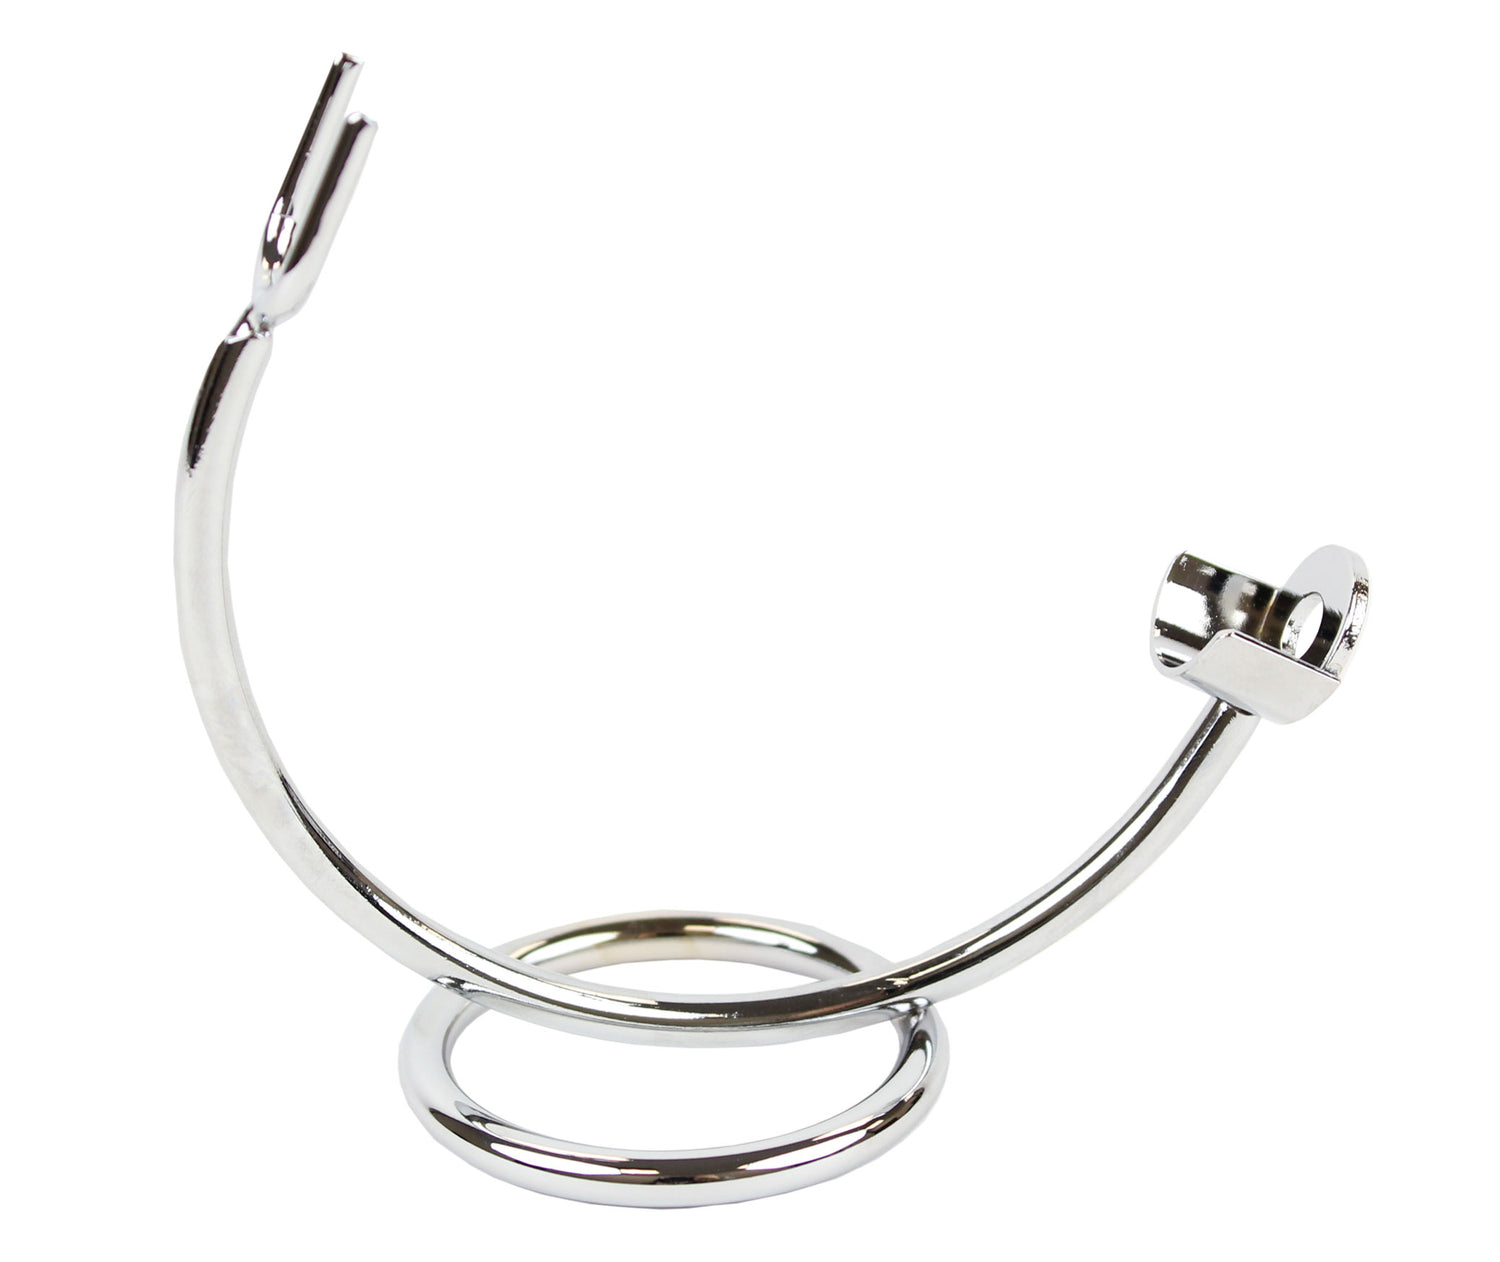
JATAI Razor + Shear Stand

$14.95

Feather F3 Cartridge Shaving Razor Blade

Feather F3 Blades (4pk or 8pk)

From $8.95

Seki Edge Suede Manicure Bag

Seki Edge Suede Manicure Bag

$10.00 $7.50
Feather Nape and Body Razor

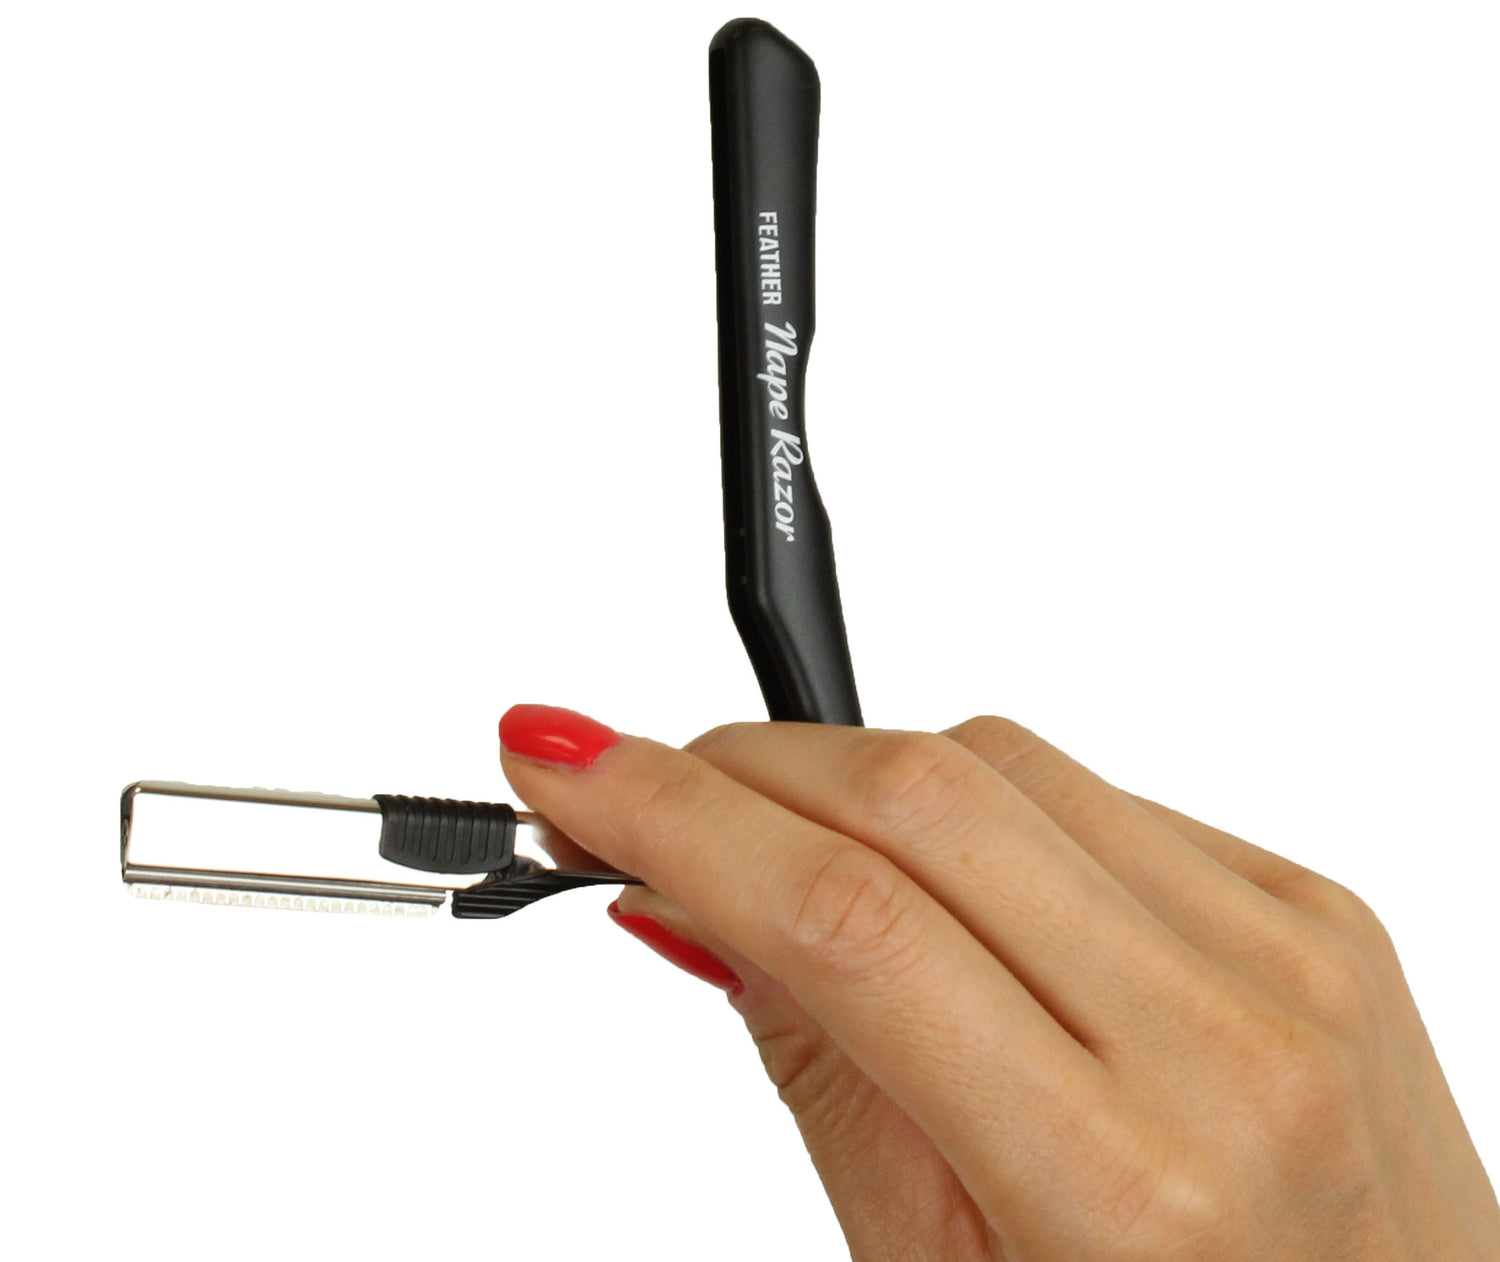
Feather Nape & Body Razor

$46.95

Feather Styling Razor W for haircutting

Feather Styling Razor W

$69.95 $49.95
Jatai Heat Shield

JATAI Heat Shield

$14.95

Option Selector
Feather Wood Look Styling Razor

Feather Wood Look Styling Razor

$54.95

Fuji Paper 4 Pack - Front

Fuji Perfect Paper (4pk)

$12.40

X Shine Blotting Paper

X-Shine Blotting Paper (3 rolls)

$12.00 $3.00
Feather Styling Razor Kit  w/Metal Disposal Case - Wood-Look

Feather Wood Look Styling Razor Kit

$64.95

Showing 48/60

RELATED ARTICLES

Getting Started with Feather Styling Razors and Blades

Getting Started with Feather Styling Razors and Blades

by JATAI, 29 Nov 2021
If you're new to razor haircutting and new to the Feather Styling Razor, you might find there are a number of choices to make when it comes to using one. We know learning how to razor cut is already a big task and commitment, so getting the most out of your razor shouldn't be. In this article, we will be covering the unique benefits of the Feather Styling Razor, the different components to the system and which blades you should be using. HISTORY OF THE FEATHER STYLING RAZOR But first, a little bit of interesting history. Prior to the 1990's there was no haircutting razor available that had a guard. While that's difficult to imagine today, at the time, if you wanted to do razor haircutting you had to use a bare blade razor. This was a problem for many hairdressers because they didn't want to cut themselves or their clients. To say the least, the fear was real.  As a consequence, razor haircutting was not popular. Seeing the need in the industry, JATAI and Feather created a new kind of razor in 1992. You guessed it, the Feather Styling Razor was born. A unique and innovative haircutting razor that not only had a guard, but used replaceable blades. It was a never-before-seen product that hairdressers fell in love with. Today, the Feather Styling Razor is the number one haircutting razor in the world. With 30 years of dependability and quality control, the Feather Styling Razor is used all over the world by stylists and even barbers.   FEATURES OF THE FEATHER STYLING RAZOR   It's a System There are several unique features of the Feather Styling Razor. First off, it's a system. You can't just have the handle to make it work. You need the blades and the disposal case too.  The brilliant no-touch system allows you to easily insert, remove and replace blades without ever touching the blade! For sanitation and safety purposes, it doesn't get much better than this. You can watch this video on how to use the no-touch system. Safe Disposal of Blades Let's talk about that disposal case for a moment. The Feather Disposal Case is a container with a slot at the top used for removing and disposing used blades. Once a blade becomes dull, you remove the blades with the case. When the case fills up, you can dispose of it properly to keep wildlife safe. Blades are still sharp once they hit the landfill, so it's important to make sure they stay out of harms way. You can dispose the case at your local pharmacy or sharps recycling center. The Handle Design The handle itself has an ergonomic design. It's easy to hold and maneuver. The hole at the end is not necessarily to put your finger in. While you can do this, it can be restrictive. So use it or don't use it, it's up to you based on your preferences. The head of the razor is made of Japanese stainless steel. It's designed in a way that holds the blade snug in place. There is no chatter or movement of the blade in the razor head, making it very easy to use the razor. You may notice there are two types of handles. There is the standard handle and then the detail handle. The detail handle is 1" shorter and designed for detailed work such as razor cutting the fringe or small areas that need attention.   The Blades Finally, the biggest feature of all is the blades. The blades are what do most of the work. Made in Japan, there is an enormous amount of quality control that goes into making the blades in order to ensure the blades are made properly. It's due to the commitment and attention to detail that Feather has some of the most dependable and consistent blades on the market. They are made of 100% Japanese stainless steel. The blades are extremely sharp so they don't snag the hair and they last a long time so one blade goes a long way! The Feather Styling Razor Standard Blades are the most popular and the first blade to be produced. It has a built-in guard and comes in a pack of 10 blades. It's the most versatile blade and used for everyday razor haircutting. For most, this will be the go-to blade.  The Feather Styling Razor Texturizing Blades was the second blade to be produced. It has a unique guard pattern that allows you to cut 25% less hair than the Standard Blades. This blade is useful for razor cutting thin hair or if you want texture but don't want to take off too much hair. It's often associated with the red handle but the Texturizing Blade can be used in any Styling Razor handles. The 
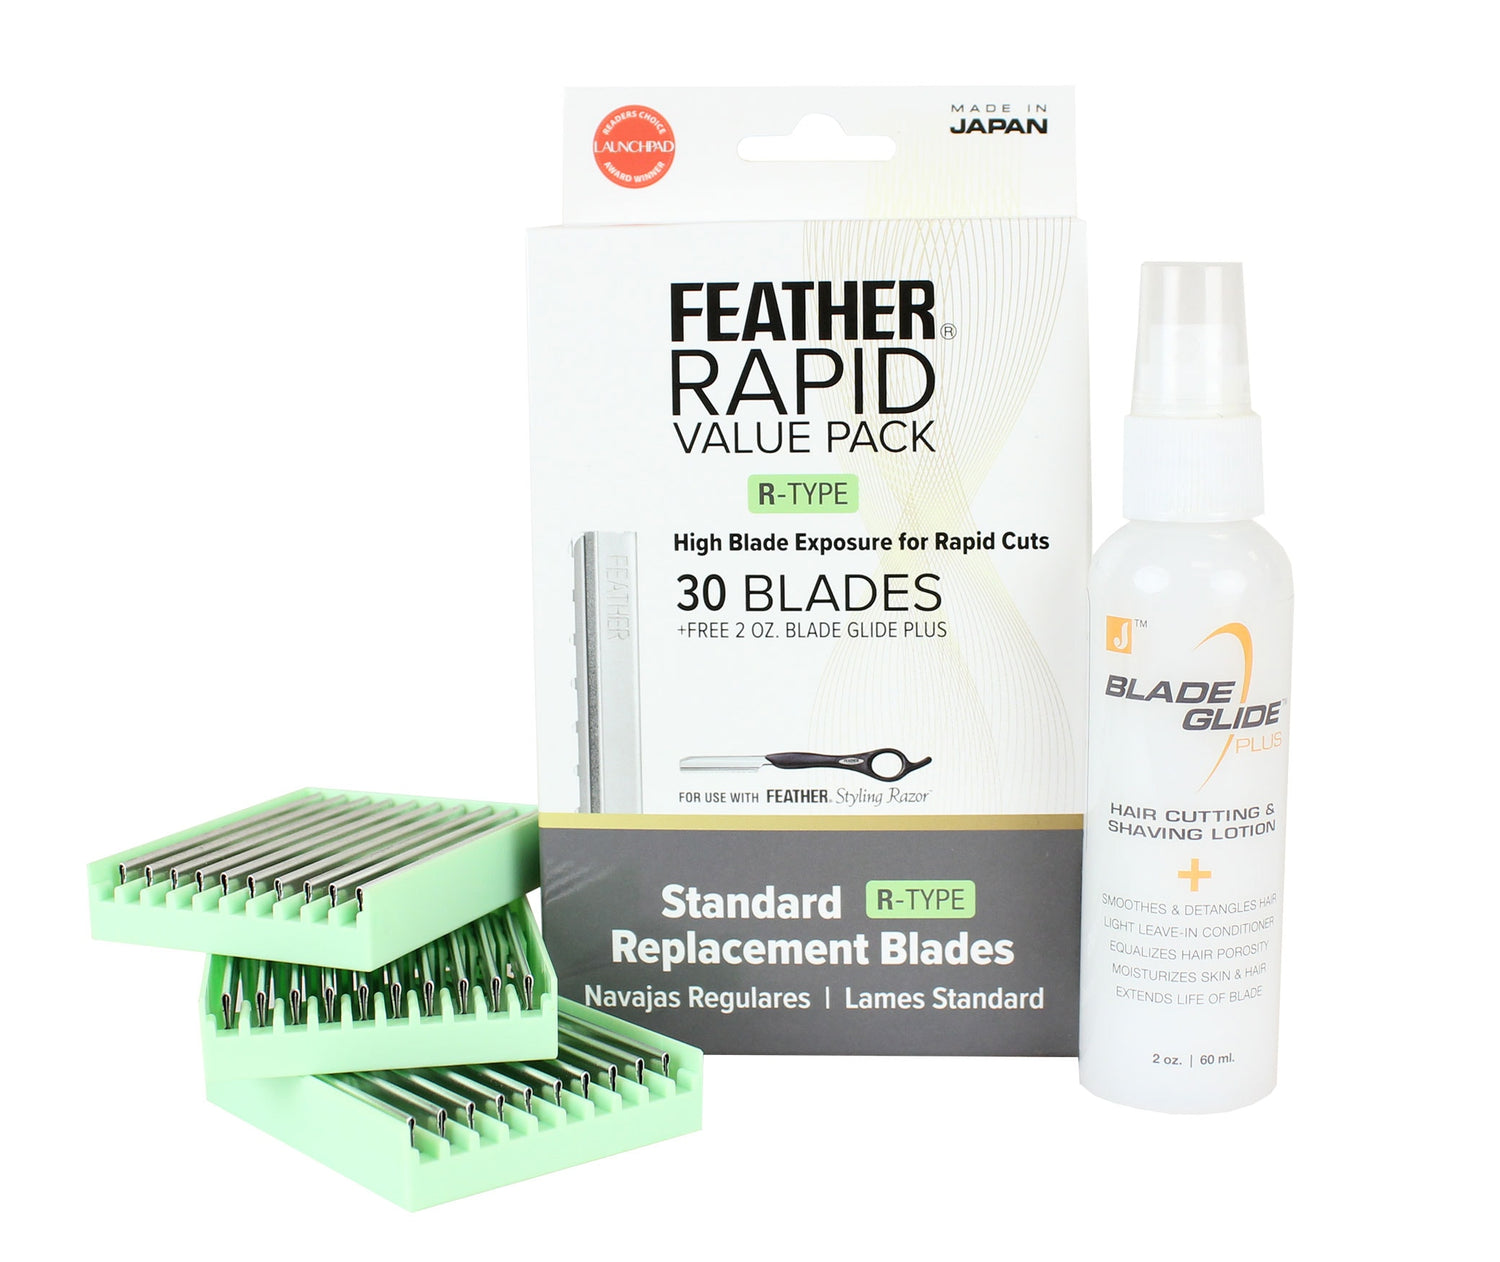
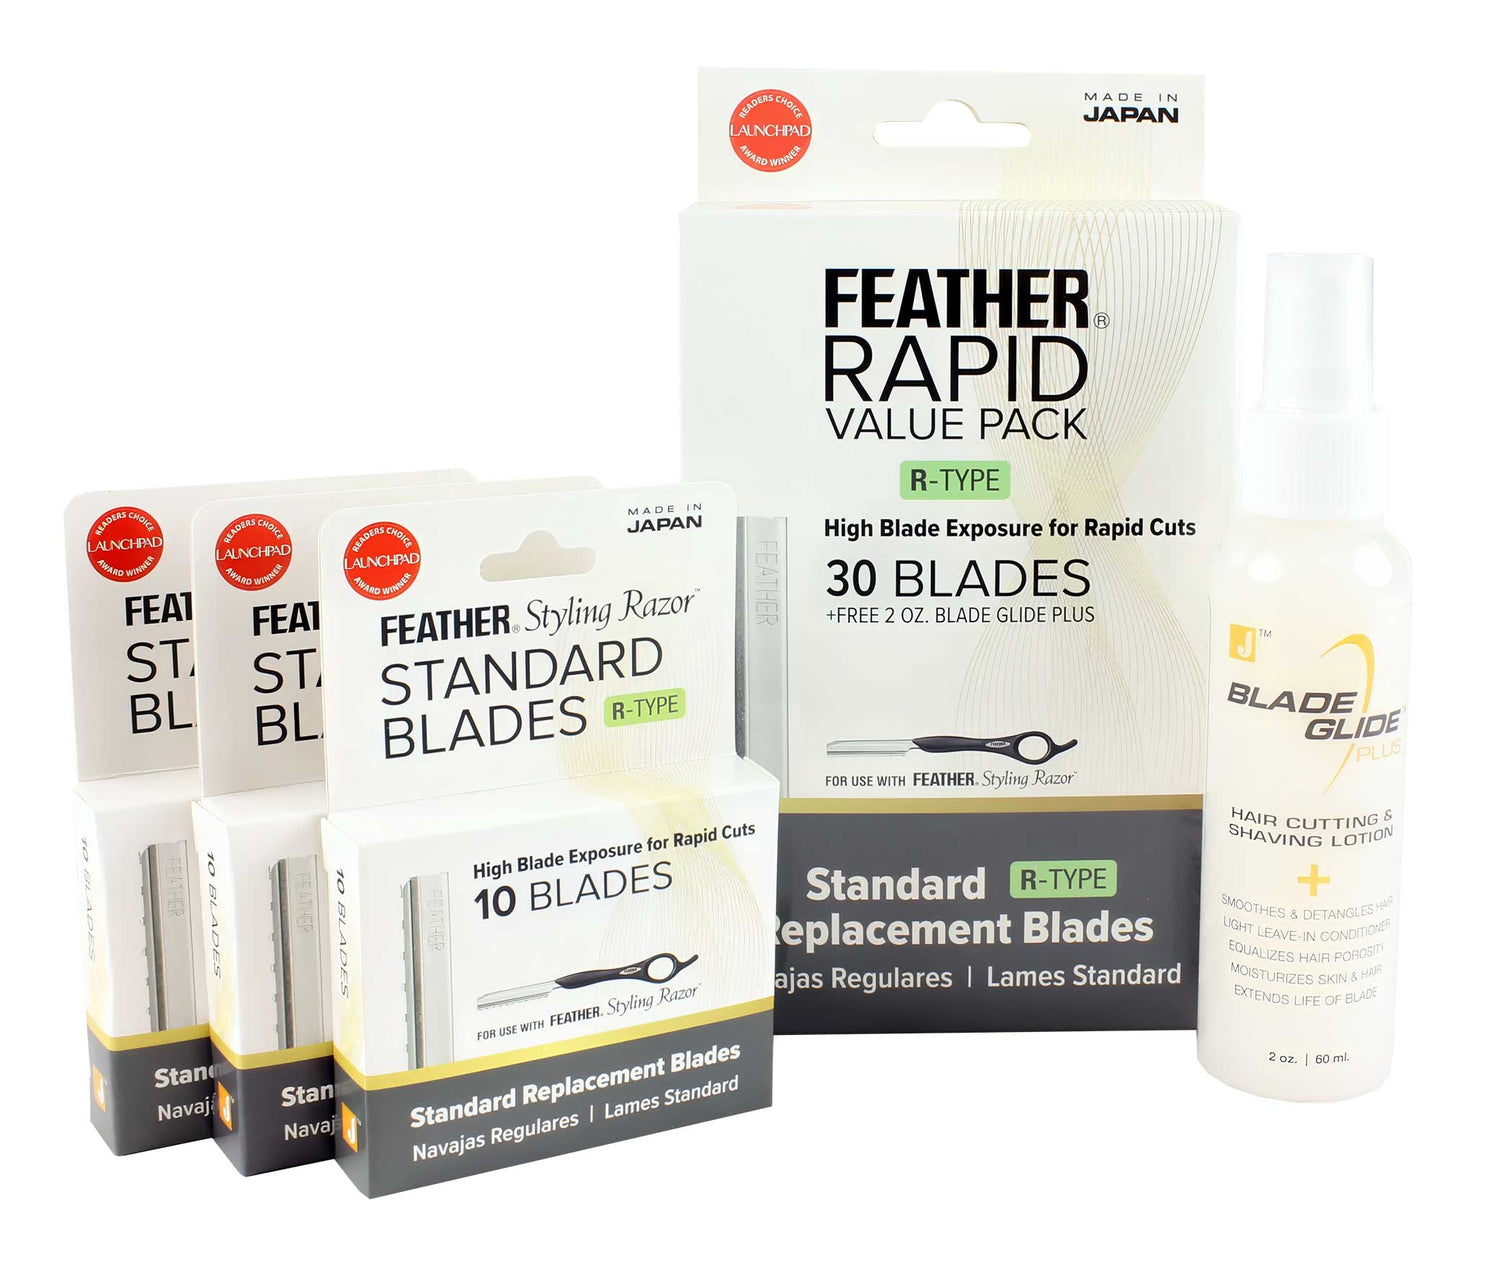
Feather Styling Razor Standard R-Type Blades is the newest of the three. This blade looks similar to the Standard Blades but it has less guard. With 40% more blade exposure, you will cut off a lot more hair so be careful! This blade is best for a razor haircutter who is quite proficient in razor haircutting, wants to razor cut more quickly and wants less resistance in the hair. The more guard there is on the blade, the more resistance there will be. So, the R-Type Blades can be viewed as a stepping stone between a guarded blade and an unguarded blade, giving the most freedom when it comes to razor haircutting.  The Feather Styling Razor and blade system works. Throughout the years, competitors have tried to come up with their own version of a haircutting razor with a guard. But many blades and handles end up being produced in China. The quality and standards are not as high. They wear out faster and don't hold up as well. We believe the razor is an extension of your hand. Razors are a tool, that if properly made and handled, you can create beautiful art with them. Like a paintbrush, if your brushes are of quality, your strokes are nice and smooth. Your experience as a painter is more satisfying and fun. And your final artwork becomes a masterpiece. You are going to love razor haircutting. It brings creativity and art to haircutting. Please be sure to check out our JATAI Academy's Education CONNECT for tons of educational videos on how to use our various razors including the Feather Styling Razor.   Product, Haircutting Razors
The Evolution of the Feather Plier Razor

The Evolution of the Feather Plier Razor

by JATAI, 17 May 2023
The Feather Plier Razor has quickly become the industry standard for bare blade razor cutting. You've probably seen it used by your favorite stylists on Insta or you've attended classes with the instructor using one. The Feather Plier Razor is the ultimate haircutting razor and the most dangerous. Prior to the 1990's most hair professionals did not use a haircutting razor. They primarily used scissors. Although there were some hairstylists that used a bare blade razor, many stylists were scared to use one in fear they would cut themselves and their clients. It was unfortunate because a razor could add so much more depth to their haircutting abilities. But in 1992, Feather and JATAI created a razor would forever change the way hairstylists looked at razor cutting. The Feather Styling Razor was born. A handle that uses guarded replaceable blades was a historical game changer in the industry. Now stylists could razor cut without cutting themselves or their clients. Since its inception, the Feather Styling Razor has quickly become the most popular and well-known haircutting razor on the market. Stylists have been able to be more creative, create new looks and experiment with the Styling Razor to further their craft. And with the ability to use 3 different blades in the handle, this further tailored to the needs of the stylist. But this article is about the Feather Plier Razor, isn't it? Yes, we're getting there... The Feather Styling Razor has been a great introductory razor for stylists. Many will stick with the Feather Styling Razor for the rest of their career. They are perfectly fine with the guarded blade and don't see any issue with the guard. But for some, the guard gets in the way, and they want more freedom. If it wasn't for social media, the Plier Razor might not have gained the popularity it has gained. For stylists, it's fun to show video using the razor to cut hair and it's satisfying to watch. It's also eye catching to see the before and after results when using a Plier correctly. It's a unique skillset that stylists want to show off because not everyone can use one. It takes practice and patience and generally a lot of money if you want to learn from the best. In fact, we see more social content around the Plier than the Styling Razor for this very reason. And while this is a valuable and admirable skillset, any stylist who uses a Feather Plier Razor will get cut. Sometimes those cuts can get nasty, but that's the price you pay for using a bare blade razor. It's interesting to see razor haircutting come full circle. From a time when razor cutting was frowned upon because it was dangerous to a time where it's highly inspirational and desirable to razor cut with a bare blade. In fact, more and more razor cutting classes using a bare blade are popping up. Why is this change happening? First off, razor cutting is minimally taught in beauty school. Razor cutting is considered an advanced skill so if you want to get good at it, you'll have to get additional training. Using a bare blade razor is considered a specialized skill. Stylists pay a lot of money to learn this skill and in turn can charge a lot more for their services because they can create looks that have more depth which cannot be created with scissors alone. So you see more razor cutting classes because there is a demand but also there are more stylists who know how to razor cut with a bare blade razor. Secondly, the hair industry is expanding and growing. Stylists are getting better faster. They are curious and hungry to be the best at their craft which means learning to use more tools, becoming exposed to new and better products, and learning from the best in the industry. Thirdly, there are many stylists who want to 'graduate' from the guarded blade and move up to the unguarded blade. By doing so, this gives ultimate freedom in razor haircutting. Sometimes the guard can get in the way. If there is too much guard, it can create drag. So they are willing to take the risk of cutting themselves in order to eliminate the guard. Stylists are becoming more brave. They are not as afraid at trying new things. But in an industry that has grown over the years, they need to stand out. Standing out could mean specializing in a certain type of haircut or being known for something specific such as specializing in razor cutting or updos. There are more niches than ever these days. Razor cutting with a bare blade is a growing industry. And what better way to do bare blade haircutting than with a Feather Plier Razor. Made in Japan, the slim French razor profile and folding handle makes this razor difficult to compete with. The Feather Plier Razor uses extremely sharp blades. In fact, there is no better blade than the Feather Plier Blade for razor cutting. They are consistent, high quality and long lasting. The Feather Plier Razor is a tool you must take seriously, or it will seriously take you. Give it respect and it will respect you back. But with proper care and attention you can minimize injury. And with proper technique you can create a masterpiece and some of the most beautiful haircuts you've ever seen. The bare blade razor has come full circle. If you're ready to take your razor cutting to the next level, start with the best tool, the Feather Plier Razor.   Product, Haircutting Razors
Introducing the JATAI Scissors in Partnership with BMAC

Introducing the JATAI Scissors in Partnership with BMAC

by JATAI, 29 Jun 2021
With every product it offers, JATAI honors the craft of hairstyling - the creativity, skill and artistry that goes into each and every cut. JATAI understands the tools stylists use, particularly scissors, are essential to not just their success, but their creativity. When it comes to tools, quality counts. That's why JATAI has partnered with leading scissors manufacturer BMAC to launch a new line of scissors exclusive to the brand: JATAI Scissors by BMAC. The JATAI Scissors by BMAC line includes four unique styles in select sizes: the JATAI Tokyo Scissors, JATAI Tokyo Thinning Scissors, JATAI Osaka Scissors and JATAI Kyoto Scissors. Handcrafted in Japan with the strictest attention to detail, the six scissors in the collection are forged from VG-10 grade stainless steel - the highest carbon grade steel available - to provide the sharpest and longest lasting edge possible for a traditionally made scissor.   THE DIFFERENT JATAI SCISSORS BY BMAC As a tribute to the origin of the scissors (and to the founders of JATAI), the scissors are each named after cities in Japan renowned for their artistic, cultural and spiritual significance:   Tokyo Scissors Tokyo is regarded as the most popular city in Japan. A cultural hub attracting visitors from all over the world, the bustling city has everything needed all in one place to get a flavor for the country. The JATAI Tokyo Scissors encompass Tokyo's well-regarded popularity and versatility. Ideal for new stylists and barbers just starting out and building their tool assortment. The most popular and affordable high-performance scissor by BMAC, the JATAI Tokyo Scissors features a top-grade metal offset handle with a single, detachable finger rest and convex blade. The custom streamlined flat contact point creates unobstructed, smooth and balanced pivot action. Available in 5.5" ($360.00) and 6.0" ($380.00).   Texturize, remove weight, volumize, layer, shape and add movement with one tool. Measuring 6", the JATAI Tokyo Thinning Scissors give a 30% cut with 29 teeth to texturize hair. Each tooth has three teeth for added softness, making it easier to create texture and layers. Featuring a top-grade metal straight handle with two detachable finger rests and convex blade, plus a flat contact point for smooth and balanced pivot action. ($375.00) Osaka Scissors While not as popular as Tokyo, Osaka is the second largest city in Japan and has strong traditional values and rich culture, but a slightly more relaxed and care-free vibe than found in other parts of the country. The strong traditional values can be best observed in the attention to detail in Osaka cuisine which is rich and nuanced.  Like the food, JATAI Osaka Scissors exemplify the traditional scissor look with a rich feel and subtle nuances that make handling it comfortable and easy to use. Featuring a slightly offset anatomically designed handle with molded tang and convex blade for a natural fit in the hand. Professional-use pivot action means unobstructed, smooth and balanced cutting and handling. Available in 5.5" ($475.00) and 6.5" ($575.00).   Kyoto Scissors Visitors to Kyoto are mesmerized by its spirituality, delicate and refined nature, and cultural charm. To experience Kyoto is to experience true artistic expression. Refined and experienced artists will immediately notice and appreciate how the JATAI Kyoto Scissors enhance their skills and creativity. This design features the utmost attention to detail, the perfect balance, the smoothest movement. The slightly offset, anatomically designed handle and single detachable finger rest create a natural fit for the hand. ($675.00) The JATAI Scissors by BMAC are protected with a one-year warranty for materials and workmanship. To maintain the warranty, the JATAI Scissors must be serviced by our authorized sharpener, Infinity Scissors in Gardena, California. Using another sharpener will void the warranty. For more information on sharpening services, please visit InfinityScissors.com.   Product, Scissors
Zendaya Bob Haircut from the SAG Awards

Zendaya Bob Haircut from the SAG Awards

by JATAI, 26 Dec 2024
The Zendaya bob haircut from the SAG Awards in 2023 was a hairstyle to remember. When she debuted the style on the red carpet, it was an instant head turner. This fashion beauty knocked this hairstyle out of the park as the old Hollywood look was elegant, classic and yet modern. In this Zendaya bob with bangs haircut tutorial, you'll learn everything you need to know to recreate this look. Follow along with the tutorial and transcript below.   Zendaya Bob Haircut Tutorial:   Welcome to the Jatai Academy.  Today we're going to be doing a supermodel bob that Zendaya wore to the Screen Actors Guild Awards. I think it's beautiful. It's luscious. It's lovely. It's elegant, graceful and modern. Alright, so if we're looking at uh you know Zendaya's hair when she wore it to the Screen Actors Guild, this is a very nice elegant one length kind of bob with just some layering around the front and a heavy solid bang with a little bit of curl in it. And I think this is a beautiful beautiful haircut on her. I think she wears it very well, but the key thing to this haircut that makes it really modern is that she has this heavy bang that's kind of brushed to the side so you get this kind of bang fill in that they used to do in roller sets, but it's a much more modern version of that. So it's got a little bit of lightness but a little bit of heaviness. And getting that right I think is the key to making this haircut really fit.   Sectioning the Hair So to start with my bob shape I want to start as neutral as possible. So I'm going to take a center part down to the crown, from the crown straight down to the occipital bone, occipital bone straight to the center of the spine. Once I got the center part, I'm going to take from the occipital bone, that bump in the back of the head, right to that bump below the ear behind the ear which is called the mastoid process. So once I got the flat part of the back of the head sectioned out, this is going to be the foundation for me to build the solid bob shape. If the hair is too thick which a lot of times it is, I will separate this in half, following the same section that I had above it keeping my lines parallel. Once I get everything sectioned out like I want and it's even on both sides, I'm going to start the section in the middle. Start that right in the center and I determine the size of that section by where the comb is flat against the head. That way I don't have to worry about inconsistent graduation because I'm cutting across a curved part of the head and elevating it inconsistently compared to a flat section.   Building the Zendaya Bob Haircut Shape And then from here I'm going to use my Jatai Kyoto Scissors. It is my sharpest scissor. It also has a nice, weighted blade so it cuts a nice clean solid section no matter how thick the section is. Comb that clean from the root down. Make sure my fingers are perpendicular to the parting. There is my section. I'm holding that as low elevation as I can. Go through cut that straight across. Make that as blunt as I possibly can. The sharper the scissor, the better. Comb this down. There's my angle. That's the way I'm combing my parting, T to the parting. So I make like a T with the hair with the parting. There's my guide. Oops, go through, cut that straight across. I push that a little bit and there's my little bit right through there. Cut that as clean as you can. Then I'm going to do the same thing on the other side. Then we're going to check and see that looks good. It looks nice and even. Now we're going to continue with the next section. I have my baseline. I'll start exactly in the middle just like I did the first section. Comb that straight down. And you'll notice when I'm combing the teeth of the comb were away from my fingers and then I hook the comb about halfway through, bring into my fingers with no tension, and then just clasp my fingers right there exactly on top of the previously cut guide. Here we start ending up with where the head is curving. So I have a flat section there, a flat section there, a flat section there. So this section requires three subsections to cut. There's my line underneath. Cut directly on top of that. My next line there, comb clean. Cut directly on top of my previously cut guide. Same thing on the other side. I'm taking little flat sections as I work around the head. Comb that down and through. There's my line from my previously cut. Cut that through. I want to make sure that I am directly on top of my previously cut guide, not cutting it shorter or longer. That's what makes this the hardest haircut to do is you have to mimic that same cut for numerous sections all the way up the head. And it gets more and more difficult to cut it directly on top of your guide. Now our next section, I followed the same pattern, the same angles of section that I was taking. I just took the next flat section up and I will start exactly the same way that I was doing before, flat section in the middle. Oops! And then as I work one, two, three. So I've got three sections on that side. As we'll continue to work down.   Follow us on your favorite social media @jataifeather   I'll continue on my little flat section. There's my parting. I comb T to the parting and cut my line parallel to my parting. Now I'm going through and cutting this as blunt as I can possibly get it because Zendaya has this really solid bob shape and it's going to be different if I was to point cut it. I don't have to be as precise. But with cutting it really blunt I have to really really maintain my precision as I build the shape or it's going to start to look funky. This is kind of a key area right here where we're working over the ear. Now what makes this section so difficult is I have a protruding ear that I have to deal with that can really throw a monkey wrench in my cut line on the bottom, but we'll show you how to deal with that after I start in the center just like I was doing previously. Comb clean. Cut everything through. Okay now as I start to get into the section over the ear there's a lot of different ways that I can deal with this. I can go through and take a section directly on top of the ear cut half of the section behind the ear and half of the section in front of the ear to leave me a little bit of space there to deal with later. Or what I tend to do is comb everything smooth with only tension that I generate from the comb. Once I put my fingers in, no tension, I hold very gently and very lightly and then just push the hair under the ear and then cut my line and if I go through, oops, and check that again and I used tension on it, you start to see a little bit of a hiccup there. That is the hair that is my safety net so that when I blow it dry and clean it up at the end I don't end up with a hole. Okay tilt down a little bit, continue on until I run out of hair.   Give us a thumbs up, click subscribe and the notification bell to be notified of future Jatai Academy content.   Now to separate the front, I'm using the same methodology of using the flat part. So I have this flat. I have the second flat which goes to this curve of the head where at that point all the hair starts to fall forward. Usually, the second flat I take that to the top of the ear. When I start my face framing, the smaller the initial section that I take right through here, the quicker that it becomes a frame. The wider the section that I take as my guide, I get a more heavy bang and then it blends down through and if I look at the photo, it's this heavy kind of bang and that blends down.   Creating the Heavy Bang So we're going to take a pretty wide section right through here, right to the center of the recession. I'm going to elevate off the curvature of the head so that it doesn't end up being a blunt heavy bang but something that flows. So it's got a little bit of layering by me elevating. It's actually going to have a little bit of graduation. So I'll pull that forward. I think I'm going to go right to the top of the lip, right through there. Cut that blunt straight across. Comb the next section into it right next door. There's that. The next piece right next door. There's that. So now as I bring the rest of the hair down, this is the hair that I'm going to use to blend my short piece down to my long piece. The way that's going to work is I'll comb this straight down in natural fall, angle my fingers. Here's my length I'm cutting to. Here's my length I'm cutting from and then I'll softly point cut that to give me a nice blend through. As long as I don't cut this piece I'm fine and I'm going to be okay. All the way down to that corner. Same thing on the other side. There we go. Now as I start to comb this we'll see this heavier kind of bang come in and then we have our blend through the sides. Blending Bangs with the Sides Next piece. This is usually the easiest piece because I just want to make sure everything blends over. So all I'll have is a little bit of hair right there from where it transitions from front to back. And again, I will comb this in its natural fall. There's my line from underneath, point cut that down and through. I have to point cut this unless I go through and blow everything dry and flat iron it and then just free form cut it like this because it's difficult for me to go through and angle my fingers straight enough to cut it blunt. I take a center section for my layering and I'm only going to layer a little bit around the front here. As I hold my first two flat sections up, you'll see my fringe fall out. I'll pull everything else up, take a little bit of that length off cutting it 90 ° off the head shape. Next piece 90 °. There's a little bit of length there to cut. Take a small piece as my guide and as I get to the crown I should have very little if any hair that's going to reach and there's just that little bit of curvature right there. Now I'll take everything on one side. Since I'm doing very little layering it's just enough to take that edge off around the front. I'll take the entire left side of the head, pull everything straight up. There is my line. There is the hair that hangs over. We're going to continue, come here, continue this straight up. There is my line. Cut that down and through and then on this last section there should be very little hair that reaches if any at all, really. Comb everything up. Be patient and diligent. Make sure everything's clean. There's a little bit right through there. Now we'll do the same thing on the other side. We got our basic shape here. Everything's looking pretty good. We got a nice solid bang.   Zendaya Bob Haircut Final Look Let's go through and blow it dry. See how it looks. Here's our end result and uh I think we're looking pretty good. Curl looks pretty good in it. I think we got the curl pattern right. Blunt all the way around except for a little bit of layering around the front. So I'm pretty happy with that. So the whole thing about this haircut is just making sure that bang is heavy and not really uh face framed and really wispy and light. You got to have a heavy bang so that when you brush it back it falls in and fills in nice and solid around the front. Anyway, let us know what you'd like to see in the future. Check out the Jatai Academy. There are all kinds of great information on there that will make you a better hairstylist and barber. And thank you so much for watching. We'll see you next time.   Final Thoughts When we look at Zendaya with short hair or long hair, she knows how to pull off many different looks. From this Zendaya butterfly bob to a Zendaya long bob, she gets it right. But you can recreate these looks as well with some know how and practice. For other bob haircut tutorials, visit Jatai Academy.   Tutorial