Free shipping on orders of $50 or more within the USA and $90 or more to Canada! Note: Shipping to Canada is experiencing significant delays. See shipping policy page.
Get the latest Academy content and special deals direct to your inbox
The short faded mohawk hairstyle is a popular men’s cut. There are many versions of this style. You can have shaved sides for more of a skin fade or a more tapered look. You can create a mohawk burst fade for a more distinct look. You can make a high fade or low fade mohawk as well.
As you can see, the variations are limitless! Mohawk fade haircuts are more edgy because there are greater differences in the length of the hair. Mohawk taper haircuts are more conservation because the sides are a bit longer and not as close to the skin. The hair length on the sides vs. the top can make it more conservative or more edgy. Watch this short faded mohawk haircut tutorial and follow along with the transcript below.
Welcome to Jatai Academy. I’m Russell Mayes, Director of Content. Today we’re going to be doing an in-depth study on one of my faves: the mohawk taper.
Now, the mohawk taper can be very, very subtle and conservative, or it can be very edgy and very extreme depending on the amount of texture, the length and where you’re going to place it.
We’re going to show you how to taper it properly, how to fit it to the head, and how to get the right amount of texture in your haircut. So let’s get started.
All right, so to get started I want to cut my short part first. So I’m going to take from the center of the recession back to the quarter part, and I’m going to curve that around until I get down to the nape.
Now, I’m not going to go all the way to the tendon. I’m going to go a little bit further in to exaggerate the fact that my mohawk is going to be separated all the way from the sides into the back.
 So I’m going to start with my Jatai Tokyo Scissors. This is a 6-inch scissor, and I like using a longer blade when I’m doing scissor over comb because I feel like it allows me to work with a much bigger section.
And I want something that has a nice point to it so I can go through and feel like I can get a lot more detailing than if I had a really small, really rounded-tip scissor.
We’re going to start here on the side. I just want to go through and remove some hair, starting to taper from really short up to a little bit longer as I go up.
So I’m going to go through and just, real crudely go through and cut shorter and get longer as I go toward the top of my sections. And I’m not worried about really fine-tuning everything in. I just want to get a crude shape going from short at the hairline to a little longer towards the parting.
Now once I get most of that hair out of the way, I want to start fine-tuning this shape. Now to fine-tune it, we’re going to put the comb in, and then I’ll make a cut. I’ll move the comb up a little bit more, make another cut. Up a little bit more, make another cut.
So it’s like—bam, bam, bam. Guess what happens next? Bam. Yes. Bam. And I just continue that as I work all the way from the bottom up to the top.
The more times that I hit this section, the closer that my scissor strokes are, the smoother that my scissor over comb is going to be.
So just start low—low expectation as you go up to the top and continue to fine-tune that as I get to the top of the section. And this is just to get rid of some hair and start my tapered shape in. I don’t want it really long here at the top. I want to keep that closer to the head.
Alright, so now that I’ve got all of my scissor over comb down and got my basic taper in on both sides— I got it a little longer at the top, tapered in over the ears, basically graduated—I’m going to go through and take my clippers.
 The clippers, I’m going to use an attachment. I’m going to start with a 1, and I’m going to close everything down. So you can adjust open or closed.
Open just means that the cutting blade is a little bit further away from the teeth, so it gives me a little softer cut and is going to be a little bit longer.
Closed is going to be up closer to the cut of the teeth, so it’s going to cut a little bit cleaner and be a little bit shorter. So I’ll just lay it against the head, go up against the head.
Once I get to where the head starts to curve, then I’ll bring the clipper away from the head. So it’s this sort of rocking motion to get it close over the ear, and then as I come up, I move the clipper away from the head so that it allows it to get longer.
Here in the back, I’ll start low, work around the ear. Since the ear doesn’t really move, it’s a little bit more difficult. Basically, work that angle in a little bit tighter over the ears.
Now once I’ve got this line here done and I got everything kind of clean like I want—it’s as close as I can get—then I’ll open up the blade a little bit. That gives me a little bit more softness so it’s easier for me to blend this a little bit higher.
And now I’m just going to use the straight blade, and I have to finesse this a little shorter over the ear and do the same sort of C-shaping method that I was using to get a soft blend.
Open it up real tight. Skin just over the ear. Angle this part of the blade away from the head; the bottom part of the blade is all the way touching the head. And once I get this area here real short, I’ll start to open the blade and then softly blend that line out through there.
Real gently open up a little bit more and that just allows me to taper that in and fine-tune that line out from the head. After I get this done on one side, I’ll go through and do the same thing on the other side.
Follow us on your favorite social media: @jataifeather
 Back with my scissors, I’m going to go through and, whatever this parting was, I’m going to take a parallel section to that. I’m going to go through and pull this straight out horizontally, leaving it a little longer right here in the front. And then we’re going to go through and point cut all of this length off.
I don’t want to go through and completely disconnect this. While this is kind of a tapered mohawk, I want this to be a little more on the conservative side. So we’re not going to go through and disconnect and leave a lot of this hanging over.
There’s my parting line. We’re going to go through and point cut everything off as we work this all the way down. It doesn’t have to blend 100% with the previously cut hair, but I want it to be pretty close.
As I get to the bottom, I may need a little more length right through there, which I think is a good thing. So we’ve got that cut off and I think that that length is looking pretty good.
So now we’re going to continue to walk my guide and pull everything over to this side. There’s my guide from underneath, following my previously cut guide. Now I’m not pulling it down to my short section. I want to continue to pull this straight out at whatever the head shape elevation is.
Last section, right at the nose. I’m continuing to point cut this, even though I’m going to go through and cut the top a little bit shorter to get my point taken out.
But I want to make sure I have some texture to it. I don’t want this being cut really, really bluntly and then having to go back and re-cut everything to have some texture in it.
The more blunt the line is that I put into it, the harder it’s going to be to start to develop some texture into it. Now that I’ve got my sides basically etched in – I will go fine-tune that in a minute—but I want to go through and cut the length on the top.
 And what I’m going to do is I’m going to take a parting. It’s going to be a little further back so that I can pull this hair from the front into the top of that parting, right where the head starts to curve so that can leave a little more length here in the front.
There’s my parting. I’ll lay my finger, I’m going to pull everything back into that, and then go through and point cut that to square it off and to cut the little point off that I went through and cut in it by pulling everything to the left side and to the right side.
Take my next section—pull it back into that parting, follow the front guide, squaring everything off a little bit. Next parting—plant the finger, same thing. Now once I get to the crown, I’m gonna go through and do the same thing, but in the opposite motion.
So here I’m pulling everything back to here. So what I’m gonna do now, is so I can develop and leave a little length in the nape, I’ll do the same thing.
Find where the occipital bone is and pull the hair up to that point. Square that off. Take my next parting, pull everything up into that. Square it off. Last section—back into the crown. I see my previous guide from the front and I’ll match those two into the middle.
 So now I want to add some internal texture. I feel like the hair is too thick. So I’m going to take my Tokyo Thinning Scissors from Jatai. This is going to go through – and it’s seamless but it will remove quite a bit of hair. So the more times I hit it, the more hair that I’ll remove.
I want to methodically go through and thin it on the first pass just to make sure I have an even amount of texture that going through the whole thing.
So I’m going to start here in the bottom—hit that a few times in the middle and then work out toward the ends. So I lift it up right in the center of the section and take some of that weight out.
Now I’ll go through and do the other side—center of the length, and then a little on the ends to taper my texture and to taper my thinning so I can remove the weight internally and then soften the edges up.
So I’ll start here in the front, half way. Half way in the middle. And then as I get closer to the edges to smooth that texturizing out. Now I’ll do one right down the center now. Oh come here.
Now I want to go through and take a little bit of this edge off right through there and I’m going to do that with my texturizing scissors and just go through and trace that hair that’s hanging over that I don’t think blends very well and just soften that up.

Here’s our end result. I think we’re looking pretty good. I think this looks, you know, cool enough without being too over the top. I think it gives it a little modernity without being so extreme and in your face.
We’ve still got this real ultra-clean edge over the ear which – you know once you’ve had short hair it’s hard to let it grow out. So this keeps it feeling clean but you also start to have a little more length in the back, you got a little bit more through here and the back of the head. You got some texture to it.
This looks really, really good. It’s really modern. And you know I’m glad my clients have been asking for this kind of haircut and demanding it and forcing me to practice at it.
Check out the Jatai Academy—there’s all kinds of fantastic information there that will make you a better stylist and barber.
Let us know what you’d like to see in the future and thank you so much for watching. We’ll see you next time.
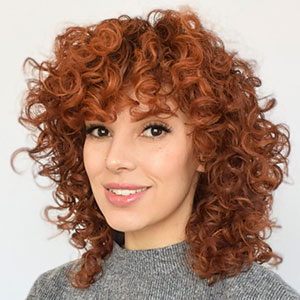
The short mohawk fade consists of short hair on the sides gradually leading to longer hair down the middle for a short mohawk. This haircut can be done on straight hair as well as curly hair. The curly mohawk gives the mohawk strip a lot of texture and fullness.
Hair type can make a big difference in the overall look of this style. What you want is a lot of texture in the mohawk portion if possible. For styling, use a pomade, gel or mousse. For a stronger hold, use a pomade. For volume and body, use a mousse.
JATAI provides innovative and professional quality beauty implements with world-class customer service and educational support. To offer great products as a master distributor, we seek out and select only manufacturers who demonstrate superior workmanship, the most advanced technology, and respected business core values of reliability, honesty and integrity. Accordingly, JATAI represents three major ‘workhorse’ brands that dominate within their categories. Feather, Seki Edge and Fuji Paper. JATAI Academy brings beauty tools to creative life. It’s the ultimate professional information resource where Education, Artistry and Trends CONNECT for Stylists and Barbers.


 good hair!
Cut by @jcolestyle
good hair!
Cut by @jcolestyle


 DEAL ENDS SOON


 For those
 #
#
 Last Call!


 Spring into savings!
  This month only, s