Free shipping on orders of $50 or more within the USA and $90 or more to Canada! Note: Shipping to Canada is experiencing significant delays. See shipping policy page.
Get the latest Academy content and special deals direct to your inbox
Do you want to learn how to cut face framing layers with a razor and scissor? Knowing how to use both tools allow you to create the desired look and effect you’re going for. In this video, Russell Mayes teaches you how to create face framing layers, a popular request among long haired clients.
Watch this video and follow along with the transcript.
Welcome back to the Jatai Academy. I’m Russell Mayes, Director of Content for JATAI and we’re going to cover two different types of face framing layering, one that’s going to be heavy and solid and the other one’s going to be light and airy.
We’re going to prep the hair with some Blade Glide from Jatai and we’re going to go through take a natural or center part and then we’re going to section off of that part from the first bump of the head where the bangs are to the high point of the ear.
 Now we’re going to take our Jatai Tokyo Scissor. It’s a 5 – 1/2 inch scissor. And I like the 5 – 1/2 inch because it gives me more control and more dexterity and forces me to work with smaller sections.
So we’re going to take a first center section. Here I’m going to pull that out, determine my length and then point cut that. That’s going to be my guide for both sides. So after I get that I’ll check the length. We’re looking pretty good.
I’ll split that in half. Now the right half of the head I’m going to keep this section and this side very very solid and heavy. And in order to do that I’m going to take all the hair comb down towards the face. I’m not elevating it. I’m keeping it very very low.
I’m going to angle my fingers, determine where my length is, and then from my short guide length in the center by the nose I’m going to choose an angle that will blend all these layers around the face from the short part to the long part.
And then I’m just going to slowly go through and start at the inner part of my finger and point cut that down to determine my length and my line. And I’m just continuing to comb everything as smooth as possible trying to avoid dragging the section. I just want to comb straight down as evenly as possible.
I’m going to use a little bit more Blade Glide where the hair is starting to dry out so I can keep an even amount of moisture throughout all my sections and continue that all the way down to my guide length on my perimeter.
 Now we’re going to continue to go through and clean that up. Now I want you to pay attention to how I’m holding my fingers and then I drag that section straight down to cut.
What I’m not doing is I’m not putting my fingers in horizontally and then dragging the section to the angle that I want to cut. Because whenever I drag the section to the angle what it does is it unevenly compresses that section and I end up with it shorter where my uh where my fingers have gaps.
So you can see my fingers have gaps there and there. So when I drag that section it’s not going to be even and consistent whereas if I comb straight down put my fingers in and then pull without dragging the section on my fingers I’ll end up with a much cleaner line.
So after I get this cleaned up like I’d like and I get that as smooth and as even as possible then I’ll start to move on to the last sections on this side of the head. Blade Glide is a good thing to use. It helps keep the hair an even amount of moisture and also makes it easier to cut so I can get a cleaner line.
Now we’re going to take from the mastoid to the high point of the head. This is going to be my next section working to the back side of the left side of the head and this is the most important transition part and I’ll really explain this on the other side of the head.
But this right here can make or break your layering especially when it comes to framing around the face. You’ll notice I’m still pulling it straight down towards the face like I was doing the first section. I’m not pulling it to the front.
I’m pulling it down and its natural fall as if it was to fall in front of the shoulder. And anything that hangs over underneath of my guideline I’ll just gently point cut off.
If you haven’t already follow us on your favorite social media platform Facebook, Instagram, Twitter, Pinterest and even TikTok.
Now once I got everything on this side I’m going to comb everything down just to double check and make sure everything’s blended. If I need anything trimmed up I’ll do that right here but this side is looking pretty good.
 Now let’s move on to the other side of the head. Now this side of the head the elevation is going to be completely different. Now you’ll see the hairline right there and that’s going to cause me problems if I point cut it like I did the other side.
So I’m going to elevate and pull it forward and then I’m going to go through and use my guide length in the center and point cut this down to my overall length on the side of the head. So the short in the middle I’m point cutting down. The only thing that’s changed on this side versus the other side is my elevation.
So by elevating it it’s going to release more weight. It’s not going to change anything else other than the weight but because I’m elevating it and the hairline is going to get exposed it’s going to throw my line off.
So now if I comb this down and I start looking at my line it’s going to be inconsistent and it’s going to mirror what the hairlines showing because you see right through there I get a heavy spot.
And then it gets weaker and goes to a point which is exactly what happens right around the temple and then the angle changes as it goes towards the end and then I get a little heavy spot right there at the bottom.
 So because I have inconsistencies of my hairline I’ll have inconsistencies of my result. So to fix that I’m going to go through and use my Feather Styling Razor. I got the fancy silver one which I really like. It makes me feel cool.
So I’m going to put a little Blade Glide on and I’m going to go through and elevate this exactly the same way but because I’m going to go through and use a razor on this what it’s going to do is it’s going to completely lighten the edges up.
It’s going to remove weight from the edges so that I won’t have that inconsistency of weight. And it will make this whole side much smoother and it will blend much easier and can be a lot lighter not so much because of the blade of the razor but because of my elevation.
Now this section I’m pulling straight forward. I’m still following my guides from short to long and I’m just going to go through and lighten up the edges.
Give this video a thumbs up, click the subscribe and the notification bell to be notified of future Jatai Academy content.
Now after I’ve gone through and I’ve cleaned everything up like I want, I want to make sure I have a smooth blend from my short piece to my angle that’s creating my length on this side and I want to try to match it as close to the other side as possible.
That’s really the hard part when you’re doing this face framing is matching the angles especially if they have an off center part. So after I’ve gone through and done that you’ll see that this is going to flow a lot better around the face.
 Make sure my lengths are the same there and then we’re going to move on to the next section which is the high point of the head right to the mastoid. Using my guide before. Now as I was saying on the other side this is the key point with your face framing.
Now you’ll notice I’m pulling it down and I’m not pulling it forward. So by pulling it down that’s going to now give me a structure of the face framing so that it keeps that layering around the face and it makes it solid but it’s still going to be softer because that first section I elevated, this section will stop it and keep it from flowing to the back.
Now here I’m going to show you if I was to pull it forward like I did before you’ll see how much shorter that length would be on the top. If I cut it like that then it’s going to force it to flow back and I’m not going to have face framing. I’m going to have feathers.
So as I continue to pull the sections forward, if I do that I end up with hair that gets feathered back and has that 70s look. But if I want to keep a face frame then I have to elevate the front to keep it light. The next section I stop that movement by holding it straight down but because I’m cutting it with a razor it’s still going to give me that same texture and blend.
A little bit of Blade Glide when I need it on the ends where it starts to get dry and this will keep that from splitting. By using the Blade Glide on drier hair like that it keeps it from splitting and forcing the cuticle to fray open.
Now we’re going to check both sides, make sure everything’s looking pretty good, make sure it’s even and it looks good to me. So now let’s go through and blow it dry. I’m just going to round brush everything very very easy, very straightforward not getting a whole lot of curl to it but just getting some body and control.
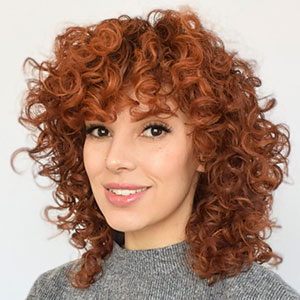
And here’s our end result. Now if you start to look at this you can really see how the left side is a lot lighter but not only because of the razor but because that first section was elevated.
Please check out the Jatai Academy. There’s all kinds of great information on there and let us know what you’d like to see in the future. If you have any questions post them below and we’ll see you next time.

JATAI provides innovative and professional quality beauty implements with world-class customer service and educational support. To offer great products as a master distributor, we seek out and select only manufacturers who demonstrate superior workmanship, the most advanced technology, and respected business core values of reliability, honesty and integrity. Accordingly, JATAI represents three major ‘workhorse’ brands that dominate within their categories. Feather, Seki Edge and Fuji Paper. JATAI Academy brings beauty tools to creative life. It’s the ultimate professional information resource where Education, Artistry and Trends CONNECT for Stylists and Barbers.